Once you have all your gear and
food, you’ll need some dry
storage bags to carry it in. Obviously, the idea here
is something to keep your load dry...under any circumstance.
Less obvious however, is the type of bags you use and
how you pack. This may seem trivial but it can
make a considerable difference in the way your boat
handles.
Packing
Many self-supporters like to use their bow either for
extra storage space or to distribute the weight to even
out the trim...or both. Equalizing the trim also tends
to make the boat balance better on the shoulder while
portaging. All this is sound logic. But, when using
the techniques and gear talked about in these pages,
I have never had the need for more space than what was
18-20" behind my seat. And only in one boat have
I ever felt that weight in the bow would have made it
easier to carry (this is also the same
boat I felt the cockpit was designed too far back in).
More importantly though, I prefer to keep gear
out of the bow as it can be detrimental to the boats
handling.
How can gear in the bow hinder a
boats performance? Swing weight, or more properly put,
moment of inertia (MOI). MOI
is simply the physics of an object that indicates the
difference in how easy or difficult it is to move about
its axis of rotation. The more MOI an object has, the
higher the force will need to be to set it in rotational
motion and vice versa. In other words, the farther your
gear (weight) is from the kayaks
axis (seat), the more effort
it’ll take to turn it. The kayak then gets progressively
more sluggish and tiring to paddle.
If you’d like to retain
as much of your kayaks original handling characteristics
as possible, resist the temptation of packing gear in
the bow ahead of your feet. And for the same
reasons, keep your gear as far away from the end of
the stern as possible too. Besides increasing the boats
MOI, weight in the tip of the stern may have you staring
at the sky coming out of holes. And the shorter the
boat, the more pronounced this will be.
These guidelines apply to all kayaks
regardless of their size. Most all modern kayaks have
plenty of space right behind the seat for the typical
Lower 48 and similarly located 3-5 day trip...if
using the techniques and gear talked about here.
On longer trips, easy pleasure cruises, those to colder
zones...or in areas requiring full climbing kit and/or
other specialized gear, one may have little choice than
to load the entire boat. In these cases, pack the heaviest
items as close to the seat and hull as possible and
use the bow for the overflow only...for your lightest
items.
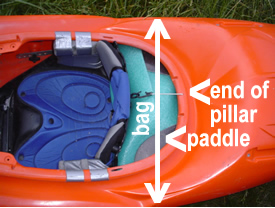 |
The standard
practice is to place two dry bags alongside the
rear pillar (one bag per side). Some boats however,
have enough distance between the backband &
rear pillar to place a single dry bag perpendicular
to the boat. This works superbly for overnighters
& ultra-light 3-day trips. Simple & it
keeps the weight concentrated near the seat where
it'll have the least effects on the boats handling.
The only thing in the stern proper in this photo
is the breakdown paddle...one half on each side
of the pillar. Pictured is a Riot Magnum loaded
with the "Overnight Summer" version
of this list with
an experimental
mattress rather
than the Neoair.
|
Additional tips:
- In some kayaks, when packing
the stern only, the handling can be improved by
moving the seat forward a little. Just be careful
not to hamper your egress.
- Carry a smaller dry bag for
items you will use through out the day: toilet paper,
lunch, etc. This way you won’t have to dig
into the more difficult to access main dry bags.
Place this smaller bag in an easily accessible spot.
Centered under the backband works well in most boats
while others will accomodate a small bag between
the paddler's legs. On this latter location, some
boats will require the simple addition of bungee
cord to the pillar or seat. See this
photo for an example (white
bungee holding red drybag in place). This
simple mod works superbly in some kayaks.
- Check the distance between
your backband and rear pillar. You may be able place
your gear perpendicular to the boat which, is highly
advantageous. See photo above and to the right.
- Many boats have places beside
or under the seat or near the water bottle holder
where things can be stashed...like a lunch drybag,
first aid kit, rescue kit, urinal, break down paddle,
etc. Take advantage of these spaces to keep the
weight away from the ends of the kayak. Just be
careful not to hamper your egress!
- Fasten every thing you don't
want to lose to the seat, pillar or backband. Use
your rescue biners if need be. Doubly duty!
- If you're new to this, consider
these two things: 1) practice at home by packing
your gear into the storage bags then into the boat
(your experienced buddies will appreciate
this at the put-in). 2) paddle your loaded
boat on a familiar roadside run to get a feel for
the weight and to test different seat positions.
- Make sure to pack equal amounts
of weight in each side and remember to take the
smaller dry bag used for lunch into account...if
it can not fit in the center under the backband.
Storage bags
The most widely used storage bags are typically referred
to as “stow floats” and are made by several
different companies. These are essentially conventional
float bags with some type of waterproof closure on the
side near the top or on the top. Insert gear, put in
boat, seal and inflate.
While highly innovative in their
day, little has changed with the basic design of the
“stow float” since its advent nearly three
decades ago. Consequently, though "stow floats"
do work, they are not optimized for today's boats or
environments. Kayaks are considerably different now
and the difficulties of the rivers being paddled are
well beyond what anyone thought was possible then.
What
to use? Stay tuned. I have been working on
a completely unique drybag design. Protos are to arrive
for testing in the spring of 2019.
|