Below is a small handfull of modifications
I have made over the years to make boats more to my
liking for general paddling and self-support. Most of
this work was done on boats which are now outdated.
I leave this page up for the purpose of sharing and
documenting my experiences only. I do not recommend
any of these or similar modifications to any kayak,
old or modern. They may cause your kayak to become unsafe
causing serious injury or death. If you make
any of these or similar modifications, to any kayak,
do so at your own risk!
Miscellaneous kayak mods
Below are a few modifications I
made to the Riot Magnum outfitting circa the inception
of the Magnum.
 |
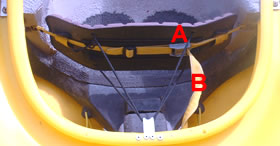
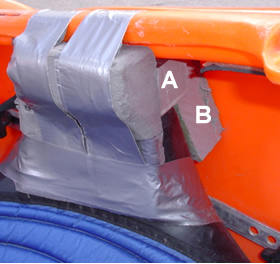
The weakest
part of the seat was further weakened with the factory
backband slot (A). This also happens to line up
with the weakest area of cockpit rim. To counter,
I spaned the slot from under the seat with a 2"
wide piece of aluminum (B); fastened it to the seat
with 8 rivets; then braced it with foam that rests
on the hull. Being that I no longer use the slot
(A), I could have done something else here that
was more effective. As shown, the gains were likely
very minimal. |
 |
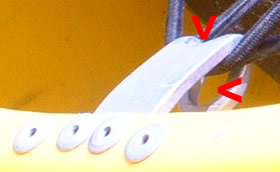
Stock, the factory
seat moved side to side enough (1.5" each
way) that I could feel it while paddling, especially
bracing. And the gap between the top of the seat
& underside of the cockpit rim created a flex
point in its most vulnerable spot. The foam on
the top (A) takes out most of the flex while the
foam between seat & sidewall (B) nearly eliminates
side to side movement. This simple & quick
little fix made the boat feel noticably better
while paddling. Excellent returns!
PS:
Gluing hip pads in produces cleaner results than
duct tape but, in an attempt to minimize my chemical
body burdon as much as possible, I quit using
adhesives. Hippie chrome works & is much faster.
|
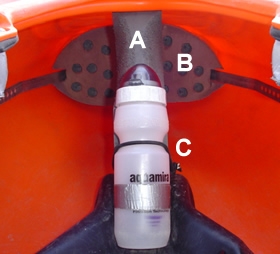 |
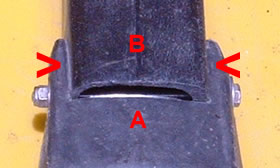
Here are 3 very
simple & easy mods. To facilitate egress,
I chamfered both sides of the pillar (A). The
holes in the bulkheads foam (B) adds a little
shock absorbtion. (C) is a bungee cord water bottle
holder. I used a plastic tube from a ball point
pen to keep the bungee from pullling through the
foam. Here's how I did it: poked
hole in foam 3" from edge with phillips head
screwdriver; pulled it out; inserted pen tube
over screwdriver & pushed it in hole; pulled
out screwdriver & run bungee through. |
|
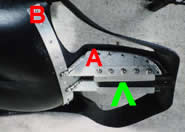
The
original Riot backband adjustment system creates
unnecessary friction. Its geometry also wants
to naturally pull the band downward rather than
forward. The way it is configured in the above
photo, the band is pulled in a straight line and
with no friction. Getting this band tight to your
back is also far easier and faster than with the
conventional ratchet system. To tighten, I simply
lean forward and pull rather than ratchet.
After numerous configurations,
this is by far the best I have come up with. I
left the original strap and ratchet in place for
a back-up. It can be made operational in one to
two minutes. The backband is a modified Riot band...the
same one shown here.
Tightening is done by pulling on the whiteish
colored toggles seen hanging below the thigh braces.
The ratchet straps run through toothed spring
loaded pieces salvaged from the older Riot thigh
strap system (like a ratchet without the ratchet
lever). These are fastened to the existing holes
used for the thigh brace adjustment and reinforced
with aluminum plates.
|
| |
|
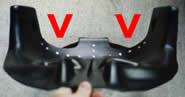 |
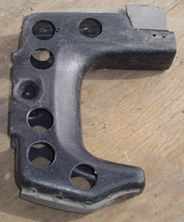
Here's an old thermo
formed seat I cut the back out of (indicated by
the red arrows) and reinforced with aluminum.
The aluminum against the existing pillar pocket
(A) was welded to a 3" wide piece of aluminum
which was also part of the 1.25" wide band
(B) that wrapped around the back of the seat.
This band assembly was then attached to the seat
with thirteen rivets as can be seen in the top
2 pics. Finally, (A) was attached to the existing
pillar pocket via one 1”x1" aluminum
angle (indicated by green arrow) per side and
a total of ten 1/8" Ø button head
screws.
Cutting the seat
like this severely weakened its structural integrity.
With the aluminum bracing, it recovered an estimated
85% of its original integrity. I justified the
15% loss due to this particular kayaks unusually
high shell strength.
For this seat and
boat, this mod worked well. It greatly improved
the access and allowed some of the weight to be
carried lower and closer to my butt.
|
 |
 |
Below are some modifications I did
to a Dagger CFS including the installation of an old
roto molded Wave Sport X seat and building a new backband
from an older Pyranha band.
Stock, the CFS was one of the more
difficult boats to load I have used. After these mods,
it was amongst the easiest of pillared kayaks. The boat
also lost two pounds in the process and retained most
of its structural integrity... and possibly gained in
some areas. Prior to this swap, I cut the back out of
the stock seat similarly to the photos above. However,
due to this seat's configuration, the overall gains
were so small, I ended up throwing it in the trash (recycling
center wouldn’t take it).
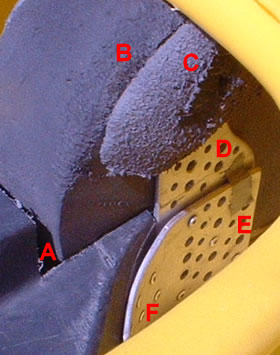
| I
cut the top part of the X pillar pocket out (A)
to accomodate the CFS pillar (B). To provide extra
pillar/seat connection, I extended this pocket towards
the stern 3" with aluminum (E). This same piece
of aluminum overlaps the seat 3" per side (F)
and is attached with 20 rivets. For additional lateral
stability, I also extended the pocket vertically
(D) to the underside of the cockpit rim & ran
a 1/4' Ø bolt through this & the pillar.
The nut & head were covered with minicell (C)
to prevent snagging or undue wear to my drybags.
To further facilitate ease of loading, the minicell
was chamfered with a rasp (B) (C). |
|
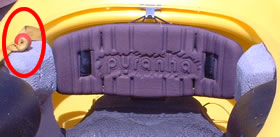
| The padded part of
this backband was salvaged from an old Pyranha.
I made the rest including the aluminum brackets
that attach it to the seat. The red ball inside
the circled area is the loose end of the adjustment
strap which extends just past my hip when pulled.
Once in the boat, I reach behind, grab the ball,
pull to tighten, drop it behind & put on my
skirt. Simple, light, and fast. |
|
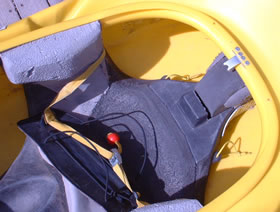
| Ready to load. This
shows the backband folded out of the way...a process
easily done in 3 seconds by loosening the metal
cam buckle & unhooking the bungee cords. The
red ball on the loose end of the adjustment strap
can be seen lying in the center of the seat. I salvaged
this ball from a rescue PFD quick release. |
|
| (A) indicates the
metal cam buckle and (B) the extra long adjustment
strap. The red ball on the end of this strap is
lying in the stern and not visible in this photo.
|
|
| This is the hook
the backband bungee cords attach to. It's shaped
like a T with the top part held to the cockpit rim
with four rivets. The slot indicated by the red
arrows allowed the aluminum to bend more easily
without breaking. |
|
| Here's the front
pillar connection. I just notched the top area of
the X seat (A) enough (2") to accomadate the
plastic CFS pillar (B), inserted solid plastic spacers
inside (indicated by red arrows) & bolted it
together with one 1/4" Ø bolt. Though
not sharp, the nut sticks out enough to have cut
my ankle in a hasty exit. It should have been covered
with chamfered minicell or something similar. |
|
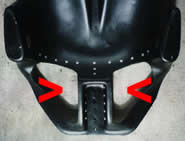
Shaving ounces
The amount which can be saved by
swiss cheesing depends on each particular boat. The
more plastic there is in the outfitting, the more that
can be saved. That said, there's usually no single mod
that will justify the time. It's the culmination
of many small mods that makes the difference. And
even then, it would be rare to save a pound by drilling
only. Removing the excess aluminum from the bulkhead
(losing adjustability for taller folks) and modifying
backbands can reduce the weight further.
Most of the time, you can expect
to lose some strength to any piece you drill holes in.
To what degree depends on the number of holes, placement,
and configuration.
 |
|
 |
 |
 |
 |
 |
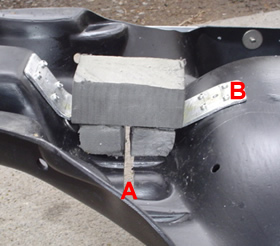
An aluminum bulkhead
I made for a Disco. |
top
|