| 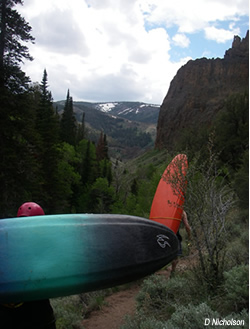 Choosing
a trip that requires a hike to reach the put-in can
add a new dimension to the overall experience. It brings
extra meaning to self-reliance,
adds adventure, forces creative packing, and tests your
physical and mental limits. Choosing
a trip that requires a hike to reach the put-in can
add a new dimension to the overall experience. It brings
extra meaning to self-reliance,
adds adventure, forces creative packing, and tests your
physical and mental limits.
There are several ways in which
to transport boat and gear long distances under your
own power. The most widely used methods are dragging
with a tow system and carrying with a backpack made
to accomodate a kayak. Dragging is easy…but, unless
there are no rocks, you’ll put a lot of wear on
the kayaks hull while leaving an unsightly trail of
plastic shavings. Not cool! Carrying with a pack system
isn't as easy but can be reasonable…if
your knees can handle it and your pack is good.
After disappointing experiences
with two commercially available packs, I built my own.
I have documented this process below for those looking
to stir their imaginations. For those not inclined to
go that far, I have added links further down on the
page to other pack systems, both homemade and commercial.
Homemade
pack system
Besides a system that would easily
stow in the kayak (Riot Magnum in this
case) once to the put-in, my primary idea was
to have a load transferring frame (to
the hips) that was not only more comfortable
than the commercial models but lighter as well. The
foundation for this system began as an old breakdown
external frame backpack made by the defunct Antelope
Camping Equipment company. Built on that are componets
made from scratch and other gear incorporated in to
minimize carried weight and bulk.
| |
| 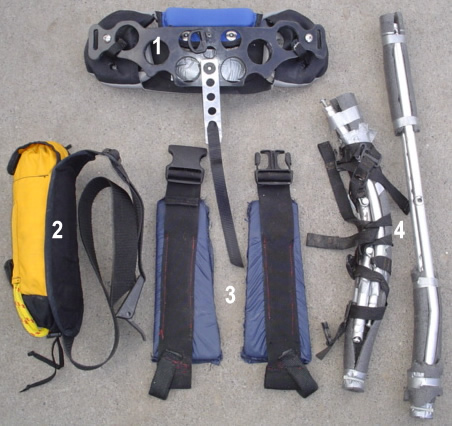
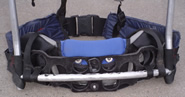
1)
backband from Riot Magnum modified to be used
as the lumbar pad 2) Salamander
Retriever waist worn throw bag used as the mid
back pad & to tie boat to frame 3)
hip belt made w/ minicell, sil-nylon, seat belt
& tubular webbing 4) aluminum
pack frame ready to stow; 5/8" webbing sternum
& shoulder straps; foam pipe insulation for
shoulder strap padding
|
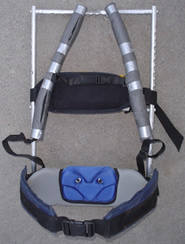 |
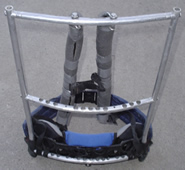
Here's
the assembled system ready for action. The boat
is lashed to the frame with the rope from the
Salamander throw bag/mid back pad. Once to the
put-in, I can disassemble the frame & stow
it in my kayak; re-install the kayaks backband;
don the Salamander & launch.
PS
Using the throwrope
to lash boat to frame works but I'm going to add
specific straps/buckles. It'll add about 2 oz
but make things far easier & faster.
|
 |
The
backband/lumbar support is attached to the lower
horizontal frame member via two webbing loops affixed
to the modified backband. The frame member slides
through the loops then is fastened to the vertical
frame members with one aluminum screw per side.
|
 |
Here's the back of
the frame minus the
throw bag/mid back support. Visible are the holes
I drilled in the horizontal members to lighten the
frame. I also drilled out the two vertical frame
members and cut 6" off the top and removed
two vertical aluminum stabilizers. The weight for
the aluminum frame only is a mere 9 oz. The shoulder
straps, sternum strap, and hip belt add another
6 oz for a total of 15 oz of extra carried weight. |
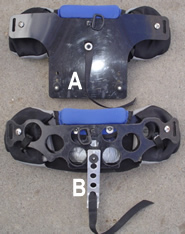 |
Here are two Riot
backbands; stock on top and one I modified to fit
the frame on the bottom. The chunky piece of plastic
(A) interferred with the lumbar fit so I cut it
off and replaced it with machined aluminum (B) that
can either be swung out of the way or removed while
in lumbar mode. The modifications & swiss cheesing
also cut the weight by 30%. |
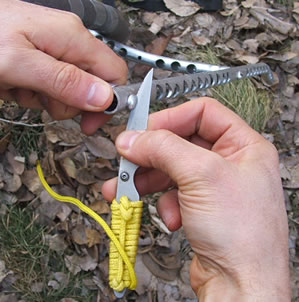 Held
together by a total of 6 aluminum screws, the
frame can be fully disassembled with a river
knife or saw blade in about 2 minutes. The webbing,
shoulder pads and duct tape holding those pads
on keep all the parts together while being stowed
beside my seat. The shoulder pads also prevent
the ends of the frame members from wearing into
the boats plastic and drybags (see
(4) in the first photo above). Held
together by a total of 6 aluminum screws, the
frame can be fully disassembled with a river
knife or saw blade in about 2 minutes. The webbing,
shoulder pads and duct tape holding those pads
on keep all the parts together while being stowed
beside my seat. The shoulder pads also prevent
the ends of the frame members from wearing into
the boats plastic and drybags (see
(4) in the first photo above).
While not as
light or simple as a "pool noodle"
system, at 15 oz, this frame weighs half that
of the lightest and most popular commercial
pack and is in a class of its own as far as
comfort. The kayak can also be carried horizontally
or vertically.
Other
pack systems under
construction
I'll add additional links
and comments as I get them. If you have a super
system of your own, know of links to others
or have personal experiences you'd like to share,
let me know and I'll get them on here.
Homemade
packs
Commercial packs
- Salamander was the first,
I believe, to enter the market with the Bak
Yak Harness. Lots of people used the original
model, myself included. Like most, I did not
find it "comfortable" but it's reportedly
more so than the popular homemade "pool
noodle" systems. These early models were
also known to come apart. Their newly redesigned
system looks good, though I have not tried
it or know anyone who has. http://www.salamanderpaddlegear.com/
- NRS has the Kayak Sherpa.
Reports have been mixed. However, it is $30
less than the Salamander Bak Yak. http://www.nrsweb.com/shop/product.asp?pfid=2932&deptid=1767
- Hydraulics of New Zealand
has what appears to be a simple system which
works similarly to some "pool noodle"
systems. If anyone has first hand experience
with this one, please let me know. http://www.hydraulics-nz.com/collections/accessories/products/strap-on
- Pyranha has a new system
that incorporates the kayaks backband. It
supposedly retails for $80. Check out a youtube
video of it here.
Using
a pack system
Whether you make your own
pack system or purchase one,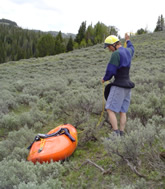 make sure you get it 100% dialed in at home.
90% doesn't cut it in the field. Donning and
doffing a loaded kayak attached to a backpack
is at best, unwieldy. Doing this more than a
couple times to fiddle with fit combined with
the preasure to make time or keep up with your
partners...frustrations can reach a point where
the pack eventually ends up in the boat and
the boat dragged or carried on your shoulder.
The over all amount of energy expended in these
situations may exceed that of simply shouldering
your kayak from the beginning. Save your energy
for the hike. You'll need it...plus some for
the river.
make sure you get it 100% dialed in at home.
90% doesn't cut it in the field. Donning and
doffing a loaded kayak attached to a backpack
is at best, unwieldy. Doing this more than a
couple times to fiddle with fit combined with
the preasure to make time or keep up with your
partners...frustrations can reach a point where
the pack eventually ends up in the boat and
the boat dragged or carried on your shoulder.
The over all amount of energy expended in these
situations may exceed that of simply shouldering
your kayak from the beginning. Save your energy
for the hike. You'll need it...plus some for
the river.
General
tips
- Though breakdown frames
like the one I used are rare, with some time
and ingenuity, one could convert a standard
frame which, are plentiful and cheap in second
hand stores (I have seen really
nice ones for under $5). Some have been
known to attach their non-breakdown frames to
their decks. With the right frame & boat
combination, this might work fairly well without
adding a significant snagging hazard. However,
even in the best case scenario, there will be
additional risks involved.
- If the terrain is conducive
to low impact dragging, use the tow system from
your PFD or waist worn throwbag. Alternate towing
from stern to bow to distribute wear on the
hull.
- Carrying
a loaded kayak for any distance is exceedingly
strenuous and sucks energy like a Hummer does
gas. Your body will beg for every extra calorie
and nutrient it can get. But, it takes energy
to carry additional food, especially quality
food that weighs more than that sawdust-like
stuff so commonly found in wrappers these days.
Enter Mother Nature. If you learn to identify
edible plants, you'll be surprised at all the
foods you can forage along the way. Think about
it. Why carry extra food (weight)
your body will crave only to walk by/through/on
perfectly good edibles? Why suffer if you don't
have to? Nourish your body by foraging at ground
level when taking breaks and at waist level
while hiking. The idea with this isn't to get
full (you'll likely expend more
energy than you gain) but rather to supplement
your food supply with fresh edibles that are
at your finger tips. Learn more about foraging
here.
|
|