The sleeping bag is the single
most important piece of self-support gear. Besides the
obvious need for warmth, the bag must also be small
enough not to rob valuable stern space and more
critically, small enough to easily slide into that stern.
If it’s not, a tiring and frustrating struggle
will ensue each time the kayak is loaded. It should
also be light, quality and perhaps, depending on your
needs, versatile enough to be used for more than sleeping
in.
The solution? A
high quality down bag. For pure warmth per ounce, there
is nothing that can match good down. And though an average
25% more costly than a synthetic bag, a quality down
bag can easily outlast synthetic two to one...or more.
Most importantly though, down bags can be half the stuffed
size as equally warm synthetic bags.
But won’t a synthetic
bag keep me warm if it gets wet? This age old
belief is a myth...a fable gladly perpetuated by those
who stand to fatten their pocketbooks. However, it is
true that a fully soaked down bag is worthless. If a
synthetic bag gets equally soaked, one can roll much
of the water out then fluff to restore a small amount
of loft…but not enough to effectively keep you
“warm”. You’ll still be miserable,
just slightly less so. If not convinced, simply take
a soaked synthetic bag in to your backyard after dark,
crawl inside and try to sleep.
The more pronounced difference between
down and synthetic is the dry time. Chances are, assuming
it is warm and sunny... and you have time to kill at
camp, if you get a synthetic bag excessively wet one
day, you might be able to get it tolerably dry by the
second day. The same can not be said for down...if
the fibers get wet enough to clump together. In this
case, drying it to a satisfactory level can take many
hours of physical manipulation and heat. This clumping
is why many down bag makers suggest throwing a tennis
ball inside the dryer in their washing/drying recommendations.
While tumbling, that ball helps break up the clumps
which, opens the fibers to airflow and speeds the drying.
Even then, a down bag will still take considerably longer
to dry than a synthetic bag. Anyone who has washed both
can attest to this.
Despite those facts, anyone
wishing to reap all the benefits of down should not
be discouraged. Why? First off, it takes more
water than one would think to cause down clumping (point
at which down becomes worthless). Secondly, it
is not difficult to keep a bag dry enough to do its
job. After spending innumerable nights camping in varying
conditions since I was a young child, I can only recall
getting a bag wet enough to cause discomfort on three
occasions. I was completely negligent two times and
was using an inadequate tent the third. Similarly, I
witnessed one poor chap suffer under a tarp shorter
than his bag and have heard of many issues with leaky/cheap
drybags. Two friends of mine also had their unattended
bags blown in to the river. So yes, a bag can get wet.
However, in every single instance I'm aware of, the
situation could have easily been avoided with a little
extra attentiveness in gear selection and camp habits.
Below are some tips to keep any bag dry, down or synthetic:
- Sleep in a quality shelter with
good ventilating properties or if using a tarp, make
sure it is adequately sized.
- Use quality drybags in the kayak
& make sure they are in good working order at
home.
- If the sleeping bag is unstuffed
& out of the shelter, loop the hood drawstring
around something to prevent a wind gust from blowing
it in the river
- Always place
the sleeping bag inside its stuff bag, or another
drybag, then in to the main drybags. This gives two-way
protection. Carrying the sleeping bag outside the
main drybags is asking for trouble...even in a separate
waterproof bag. Still worried? Place the bag inside
a garbage bag, then in to it's stuff sack & finally,
in to the main drybag. Three-way protection!
- Don't set your shelter in a natural
drainage area or in a depression which may collect
water.
Differences in down insulations
If you're in the market for a down bag, be aware that
not all down insulation is created equal.
Low quality down has little to no advantage over good
synthetic. The determining factor for down is the "fill
power" and is the very first thing you should check.
Fill power is determined in a lab when one ounce of
a given down is allowed to fully loft in a testing cylinder
and then weighted with a piston. The volume is then
measured in cubic inches and that calculated number
represents the fill power. Basically, an ounce of down
that takes up 700 cubic inches in this testing cylinder
is labeled "700 fill down". Therefore, the
higher the fill, the warmer per ounce the bag will be.
Or, in other words, the higher the number, the better
the insulation. To give you an idea, 550 fill is what
some synthetic makers compare their best to. The true
virtues of down will start to be seen with 700 fill
and get better up to 900. You might consider 750 as
a minimum.
Water resistant down
Several years ago, down treated to
make it more water resistant appeared in the market.
It was a luring technology that in theory, made sense.
As such, many bag makers hopped on the bandwagon. However,
though there are anecdotal reports of it being of good
value in certain environments, it's still too early
for a solid consensus amongst the various user groups.
There are also questions that have yet to be fully answered.
Like any other "treatment", it's only going
to last so long. How long, under what conditions, and
then what? When the treatment wears off, is the down
as good as it was in its original state....or worse
off in some way? Also, what chemicals are used in the
treatment? Many of the chemicals used to make gear water
resistant are known to be hazardous and have been the
subject of recent discussion.
Manufacturers in general have a
long history of being quick to jump on the newest advancements.
It keeps them in the spot light and makes sales. That
said, I think it's very telling that some of the longest
lived and most respected bag makers in the world are
not offering bags with water resistant down. For example,
Feathered Friends does not use it nor does Western Mountaineering.
In fact, Western Mountaineering states the benefits
of treated down are "widely overstated" and
that it "could actually inhibit performance over
the lifetime of the product". Zpacks, a respected
cottage gear bag maker, discontinued it citing a clinginess
within the down creating clumps making it more difficult
to fluff the bag. For me, I'm sticking to the proven
stuff: Good old fashioned high quality down.
Are there occasions when
synthetic bags are the better choice? Absolutely.
If you need something hypoallergenic, a synthetic bag
might be the way to go. A synthetic bag may also be
the better choice in excessively humid or rainy locales,
although, a down bag with a waterproof/breathable shell
combined with a VBL as outlined below would still work
in many cases. At any rate, I'd also recommend a synthetic
bag if you already had one that worked well in conjuncion
with your boat and other gear. Why not? Save your money
or spend it on some thing you truly need.
Shopping for a synthetic
bag
Just like purchasing most other gear, if you choose
an appropriate model from a reputable company, chances
are you will be happy. You will however want to make
sure the bag contains a proven insulation. One would
like to think the industry would not market a product
without thorough and time honored testing yet, in the
race to become the first to introduce some thing new,
it happens. I had one "high-end"
synthetic bag, with the then latest insulation, lose
more than 50% of its loft after less than a dozen uses.
What shape? There
are three basic shapes to sleeping bags: mummy, semi-rectangular
and rectangular. Designed to follow the contours of
your body which, minimizes the amount of dead air space
your body must heat and the bag to maintain, the mummy
shape is the most efficient. They are also the smallest
and lightest. The rectangular and semi-rectangular bags
will take up too much space to make them a consideration.
 |
 |
 |
 |
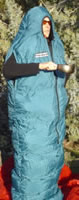
The
hybrid bag is a regular sleeping bag when you want
it to be...or a parka or a suit. Sleeping, cooking,
walking, lounging or relieving yourself, you are
always surrounded by warmth. And arms in or out,
foot box open or closed, hybrid bags are readily
adjustable for changing nighttime temps. The bag
in the upper left is a modified Western Mountaineering
Linelite which is no longer being made. The other
bag is a Feathered Friends Rock Wren w/ a waterproof/breathable
shell.
|
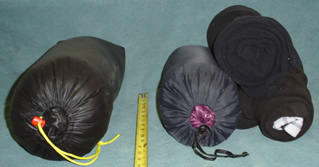 |
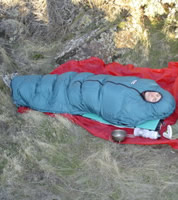
| To
the right of the tape measure is a popular 35°
16 oz sleeping bag w/ fleece pants & jacket.
Total weight = 2lb 8oz. To the left is the 35°
Feathered Friends Rock Wren hybrid bag shown above
& below. No need for additional clothes. Weight
= 1lb 12oz. |
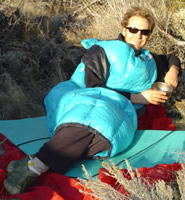
Eliminating redundancy is an easy
way to minimize weight and bulk. An example of this
can be seen in the photo to the right comparing a hybrid
bag to a conventional bag with with fleece camp wear.
With the highly versatile hybrid, it is possible to
get by without packing any additional camp clothing,
even when the temps are cool. The hybrid is also wonderfully
cozy to lounge around in on a cool evening and works
ok while performing light camp duties.
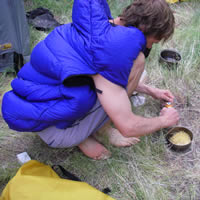 |
| Cooking dinner
in the Feathered Friends Rock Wren. |
However, as
versatile and novel as the hybrid is, they will not
work well for everyone in all situations. In most instances,
the conventional bag and clothing combo makes
for a more versatile set-up. For that reason, I abandoned
my hybrid on colder trips in favor of a more conventional
bag. I can more easily move around camp in my
down jacket and pants than the hybrid bag...and when
sitting around a fire, I'd rather take a chance with
a popping ember hitting my clothing. Also, in the case
to the right in the above photo (with
tape measure), where both bags have the same
temperature rating, one can wear the additional clothing
inside their conventional bag and have a warmer sleeping
arrangement.
Neither system is perfect in all
contexts. Pick the one that will best suit the majority
of your situations.
Hybrid bags:
- Feathered
Friends Rock Wren & Winter Wren:
the original hybrid; reputable;
building bags in Seattle since 1972; will customize.
- Western
Mountaineering Linelite: esteemed
USA made company; lightest & most compact hybrid;
needs modifications to work optimally;
no hood; sewn through construction; no zipper; suitable
for summer only; narrow footbox (big
people won't be able to pull it up to walk.
It's barely big enough for my lean
5'-11' & 150lb build) NOTE:
If interested in a Linelite, you'll have to look for
used as it is no longer being made.
- Exped
Dreamwalker: full zipper; hand warmer
pockets; imported.
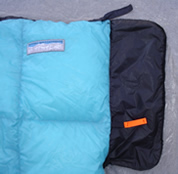 |
The
no longer made Western Mountaineering Linelite was
designed to be used as a liner to extend the range
of sleeping bags. However, with the addition of
draft flaps & closures on its arm openings,
this little package transforms in to an incredible
15oz hybrid sleeping bag for small to medium folks.
In the photo to the left, the large black piece
is a sil-nylon covered 200 wt fleece draft flap
I added. The orange thing is a pull tab for the
velcro closure. Tuck the flap inside & velcro
the arm slit closed. Combined w/ a full length pad,
the clothes I wear
under my drysuit, a poncho VBL and bivy, this
bag has very comfortably taken me down to the low
40’s. |
What temperature rating?
Temperature ratings are to assist in making a decision
within a single manufacturers line of bags. And then,
they are only rough guidelines assuming ideal conditions.
Temperature ratings can not be used reliably
to compare different manufacturers nor the extent of
each individuals metabolism. The best way to
compare warmth when comparing different brands is to
look at the loft. If the bags have the same general
construction, shape and girth, the bag with the most
loft will be warmer. Most quality bag makers will list
the loft in their spec sheet. To measure your own, fluff
up the bag as much as possible, lay it out on a flat
surface then measure the height. Just as an example,
down mummy bags with 4" of loft will generally
be rated to around 30°.
 |
What this Seattle made bag lacks in versatility,
it makes up for w/ an unreal weight/warmth ratio:
Loft of a 15° bag throughout at only 20.69
oz! Meet the
Feathered Friends Vireo w/ custom
overfill & custom Goosefeet down
hood w/ built-in cuben fiber VBL
liner. Bag+hood = 22.25oz! Total cost = less than
many off-the-shelf bags half as warm. 900+ down
fill, thin cut, ultralight liner/shell, &
no zipper make all this possible.
Simple is
beautiful!
When
cold enough to warrant this bag, I also carry
my hooded down jacket which I wear inside eliminating
the need for the Goosefeet down hood shown. NOTE:
Feathered Friends now offers this bag as the Tanager.
|
Ideally, if
you have money burning a hole in your pocket, owning
two bags with different temperature ratings is the ticket.
Otherwise, a general guideline I'd suggest using is
by choosing one with a rating close to the lowest temperature
encountered regularly. Notice that
I emphasized regularly. Buying too warm a bag for the
intended usage just creates unnecessary weight and bulk.
Plus, I have never found a bag like this to be overly
comfortable. Leaving it open is a lot like laying next
to a fire in the cold open. One side of your body will
be sweating while the other side is left with goose
bumps.
Now, to get to a starting
point, consider where you will most use the
bag and during which season. For instance, if most
of your self-support will be done where and when freezing
temperatures will rarely be encountered, a 30°
bag from a reputable company would make a good starting
point. From that point, adjust up or down according
to your particular metabolism. For instance, if you
find yourself wearing a sweater when everyone else
has a tee shirt, consider a bag rated 5° - 10°
colder (25°-20° bag).
And if everyone is wearing fleece pants and you shorts,
you might consider a bag rated 5° or perhaps...if
you are willing to deal with the occasional cooler
night, a bag 10° warmer (in other
words, a 35° bag or, if you're brave/confident,
a 40° bag). That said, 20° bags are
the most commonly used in the Rocky Mountain region.
| Though
generally considered a piece of gear for serious
mountaineers in subfreezing temps, a VBL
can serve a self-supporter equally as well. They
prevent evaporative cooling & keep body moisture
out of the bags insulation where it can accumulate
adding weight & robbing warmth. Rather than
a conventional VBL though, which
is just a bag that can't be used for much else...wear
light weight non-breathable rain gear or better
yet, one of the most versatile pieces of gear
a self-supporter can carry; a poncho.
A poncho will cover the most crucial parts of
your body; the core & head. Large plastic
leaf bags work too as do plastic garment &
dry cleaning bags. Though I typically don't use
a VBL on my body, my feet tend to chill easily
so use them there frequently. Left over food
bags work beautifully here. A small rubberband
around the ankles keeps the bags on. The bags
can go against bare skin with socks over, or the
bags over the socks. I find the latter to be more
comfortable. Last thing: Very effective, yes.
Just be prepared for a stench akin to days old
road kill when you pull the bags off your feet. |
Remember too
that using a bivy can add several degrees warmth and
regardless of shelter type...you can easily
boost the temperature rating of a bag by wearing clothes
inside. In addition to clothes, you can
add even more warmth by wearing a vapor barrier liner
(VBL)(see description at
right).
For the sake of saving weight and
bulk, I will often times take a bag rated for warmer
temps and increasing its warmth, if need be, by using
the above methods. I'm already carrying that stuff so
why not? I have comfortably taken a bag rated to 35°
down to 17° by doing this. That said, there's more
to sleeping warm than a good bag and wearing your clothes
to extend its comfort. Below are a few tips to insure
the best nights sleep possible:
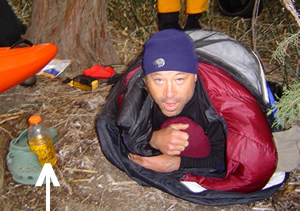 |
| Relief from within
the warm cocoon. Frequent urinators will appreciate
the benefits of a Gatorade bottle. Steady hands
and total cerebral focus mandatory. |
- try to eat a filling & warm
dinner meal that will release energy slowly
- stay hydrated throughout the
day
- warm-up next to a camp fire
before going to bed
- sleep in an enclosed shelter
and up and away from the water (Remember.
Cold air drops so the riverside will be the coolest
place to sleep.)
- choose a site that is naturally
protected from the wind
- place insulation under your entire
body (see sleeping
pads)
Bag care
A quality down bag will last many years, perhaps even
a lifetime for many...if well cared for. Below are a
few tips to get the most from yours (the
same care should be given to synthetic bags as well):
- Never store the bag stuffed.
Keep it stored loosely in an over sized cotton bag
in a dry dark area (old musty basements
not recommended). Some manufactures include
storage bags. Other wise, you can buy one at any good
outdoor store or you can make one from an old sheet.
- Upon wakening, hang the bag outside
allowing it to dry of body vapor and shelter condensation.
Do both sides and preferably in the shade. The sun
will dry it faster, but don't over do it. The UV rays
will gradually weaken the material.
- Unless absolutely necessary,
do not use a compression sack. And do not lay or sit
on the bag while stuffed. All this puts unnecessary
stress on the insulation.
- Always place some thing between
the bag and the ground.
- If tolerated, sleep with a top,
shorts and socks on to keep excessive body oils and
perspiration out of the insulation. This will do the
same as sheets on a bed and combined with frequent
airing, will lessen the need for frequent washing.
Clean = more loft. More loft = more warmth.
- Bags require careful washing
techniques & special soap. Wash as per manufacturers
recommendations.
- Handle the bag with care. Don’t
just rip it out of its stuff sack or you might tear
a baffel in the process. Gently shake it out.
- Do not leave the bag stuffed
any longer than necessary. Unstuff it as soon as you
get to camp and if possible, keep it unstuffed to
and from the river.
- When you get home, hang the bag
some where out of the sun and let dry several days
both inside and out. Or, stick a fan in its opening
for a few hours.
- Make every attempt at keeping
your bag clean inside and out as washing too often
can be hard on the insulation and baffles.
|