|
A solution
to the problematic refrigerator in the VW Eurovan Winnebago camper....
plus other modifications, rack installation, luggage tray fixes,
and van lift.
Fridge
I started having issues with the
fridge immediately after purchasing my van in 1996. Tired of tinkering
with, and taking it to the shop, I gave up and started using it
as an ice box after a couple years. Being small and not very well
insulated (ie, melting ice = wet floor), I was not happy with the
results in that mode either. Still, for reasons unknown, I hung
on as if there were no other option. Then, on the drive home from
a road trip in the summer of 2011, I had the epiphany to do what
others had done before me in the older VW vans. Wondering what had
taken me this long, I yanked that fridge out as soon as I got home!
I fully understand the lure of having a well
functioning fridge in a van like this. However, while they may be
better than those in the older Vanagon Westfailas, these Eurovan
fridges are still riddled with problems. The internet is rife with
disgruntled owners seeking fixes to a seemingly endless array of
issues. For those who are not gluttons for punishment, clinging
to the original equipment, there are replacements that are reportedly
more reliable. They come at a steep price though. Some would rather
do away with that style of fridge altogether and either use a "portable
fridge" or a good old fashioned cooler. For these folks, Gowesty
came up with a Eurovan "Fridge Elimination Kit".
Looks like a great kit. On the other hand, at $300 + shipping, they
are pricey. My solution was about $290 less and, more versatile
for my needs. It also looks more factory. It was certainly more
work than installing the "Elimination Kit" though! Regardless,
I could not be happier with my decision. Besides lifting the van
for additional clearance, this is the best thing I have done to
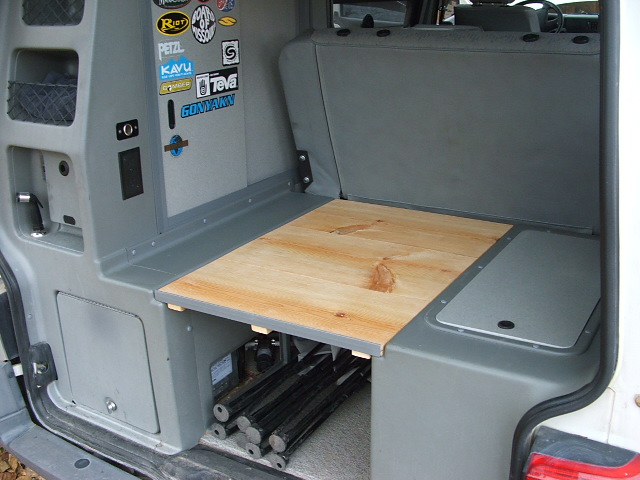
this vehicle. In the place of that fussy fridge is something simple,
dry, stone reliable, versatile (table &/or bench), and inexpensive.
I now have some much needed storage space to boot! Below is a general
outline of what I did.
WARNING
I shall have no liability or responsibility to any person with respect
to personal harm or property damage caused indirectly or directly
by any material found on this web page. If you do any of these modifications,
do so at your own risk!
| 
|
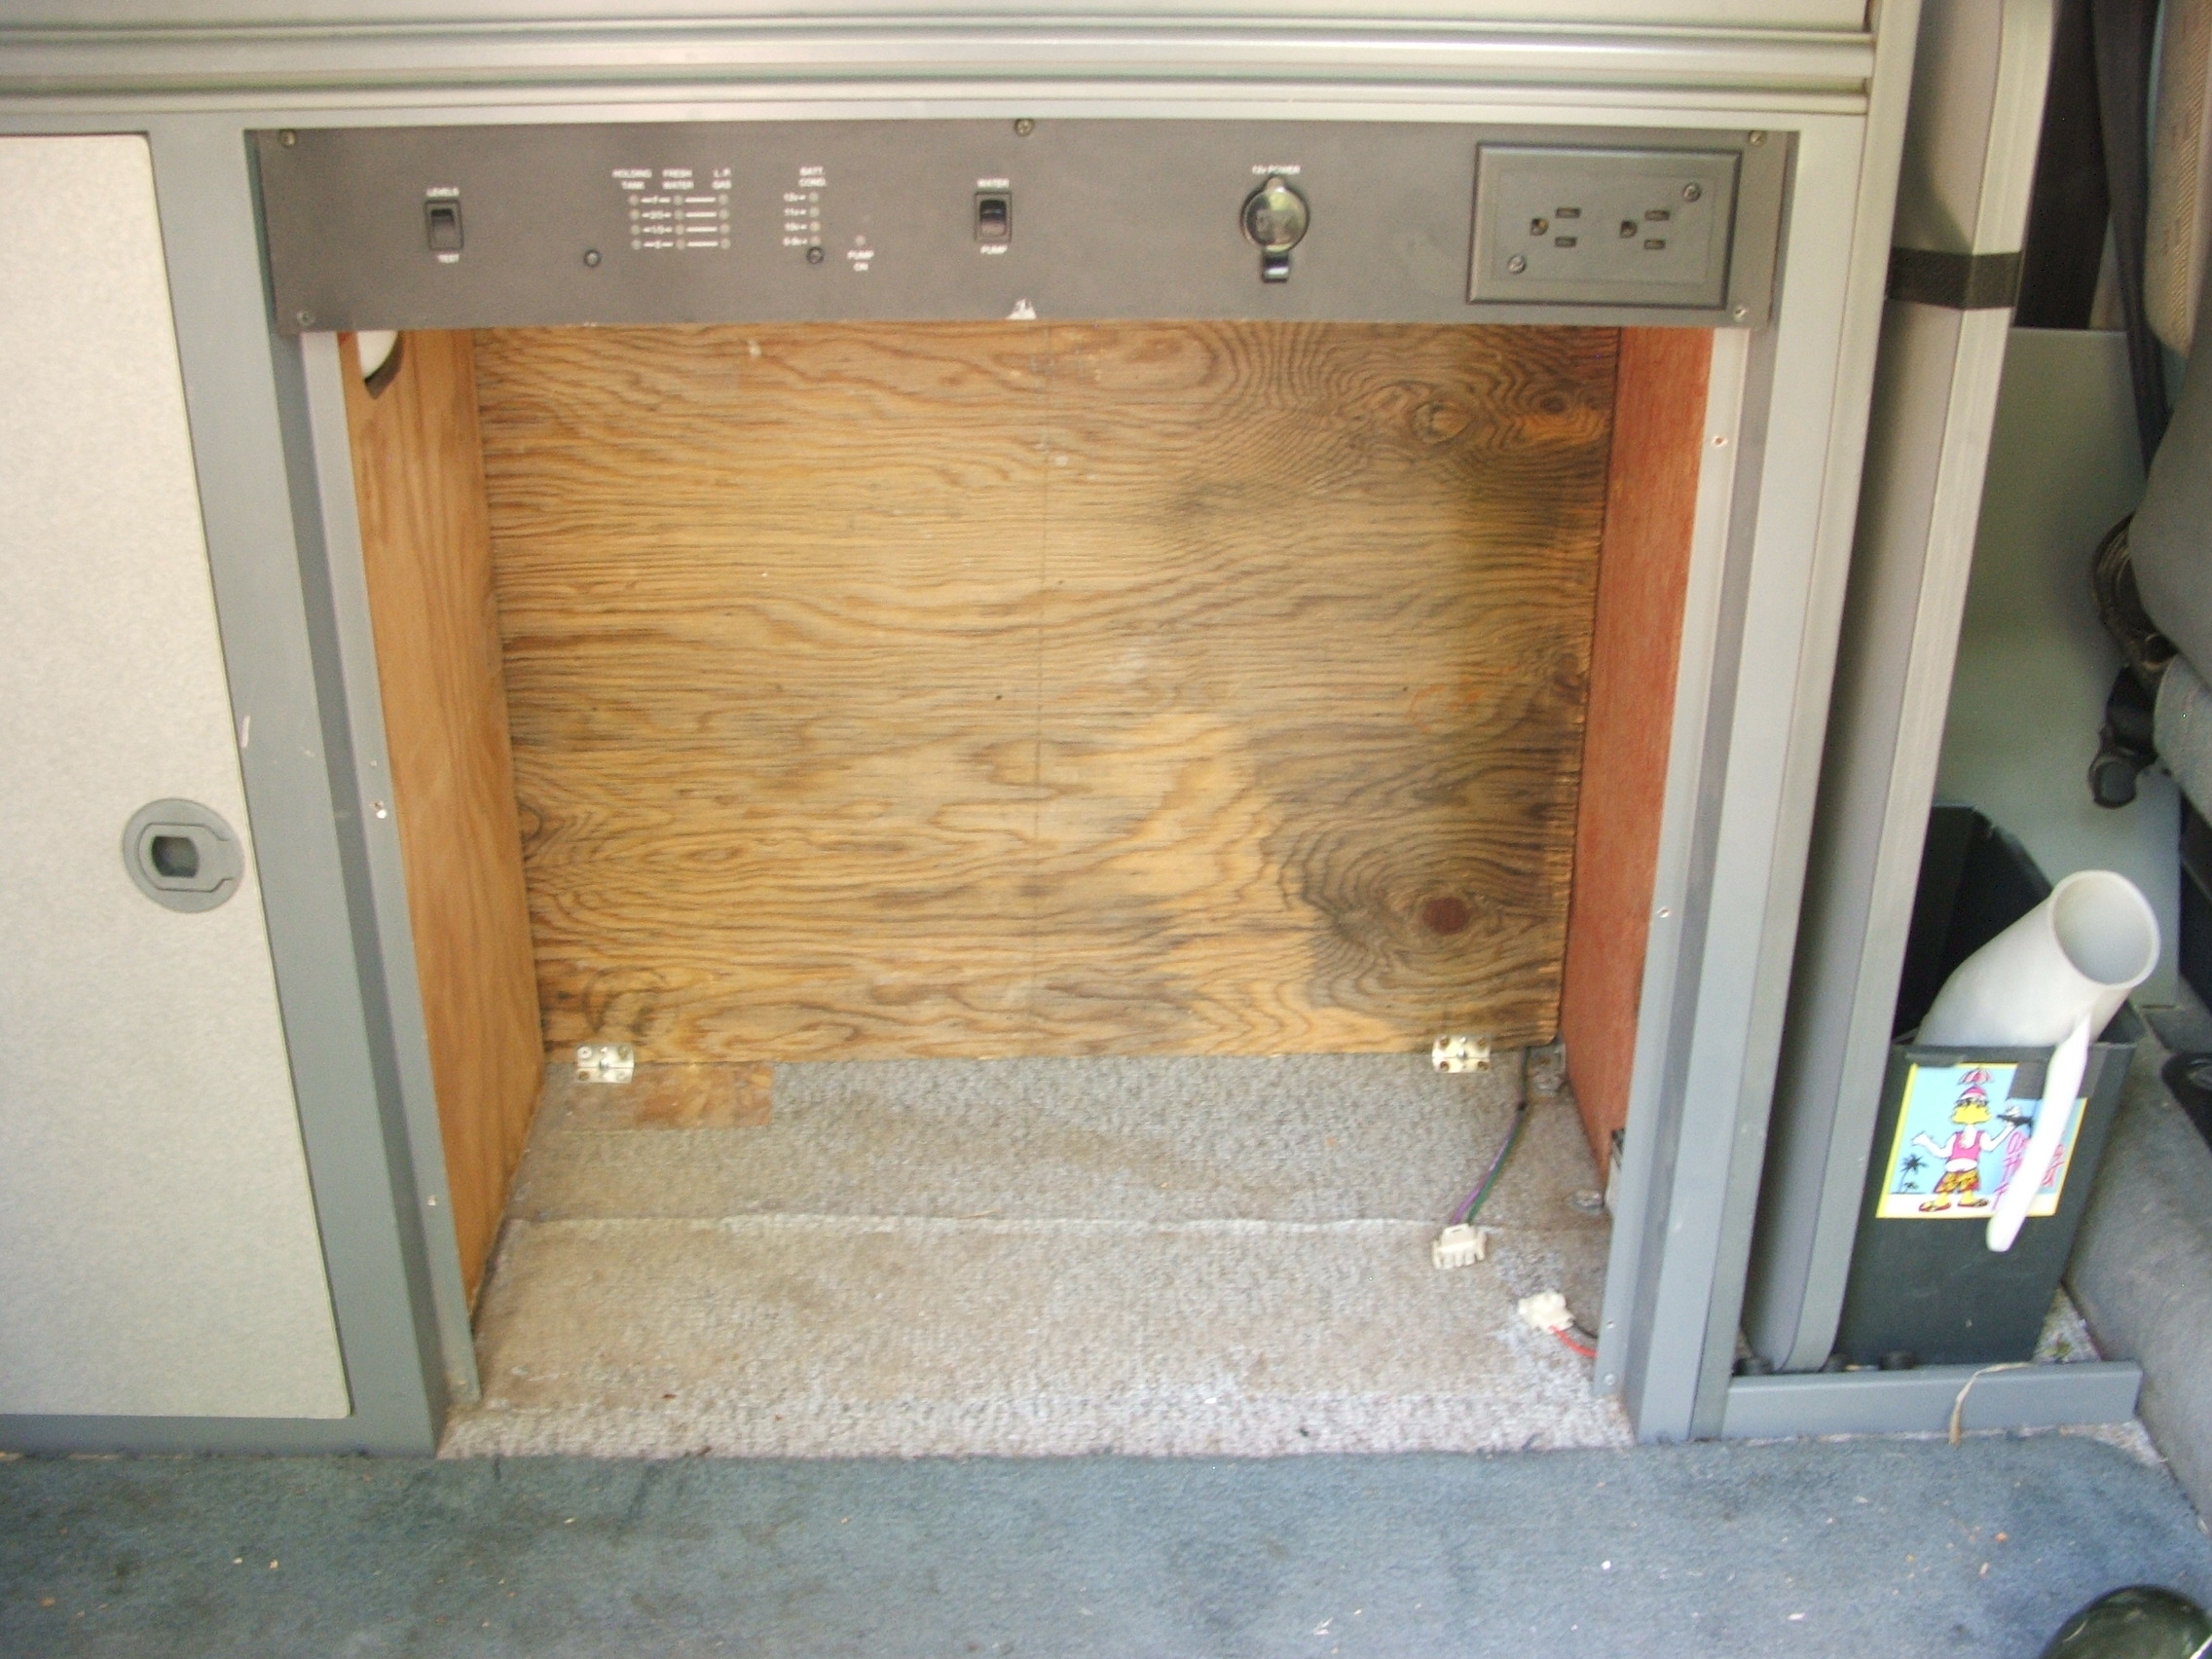
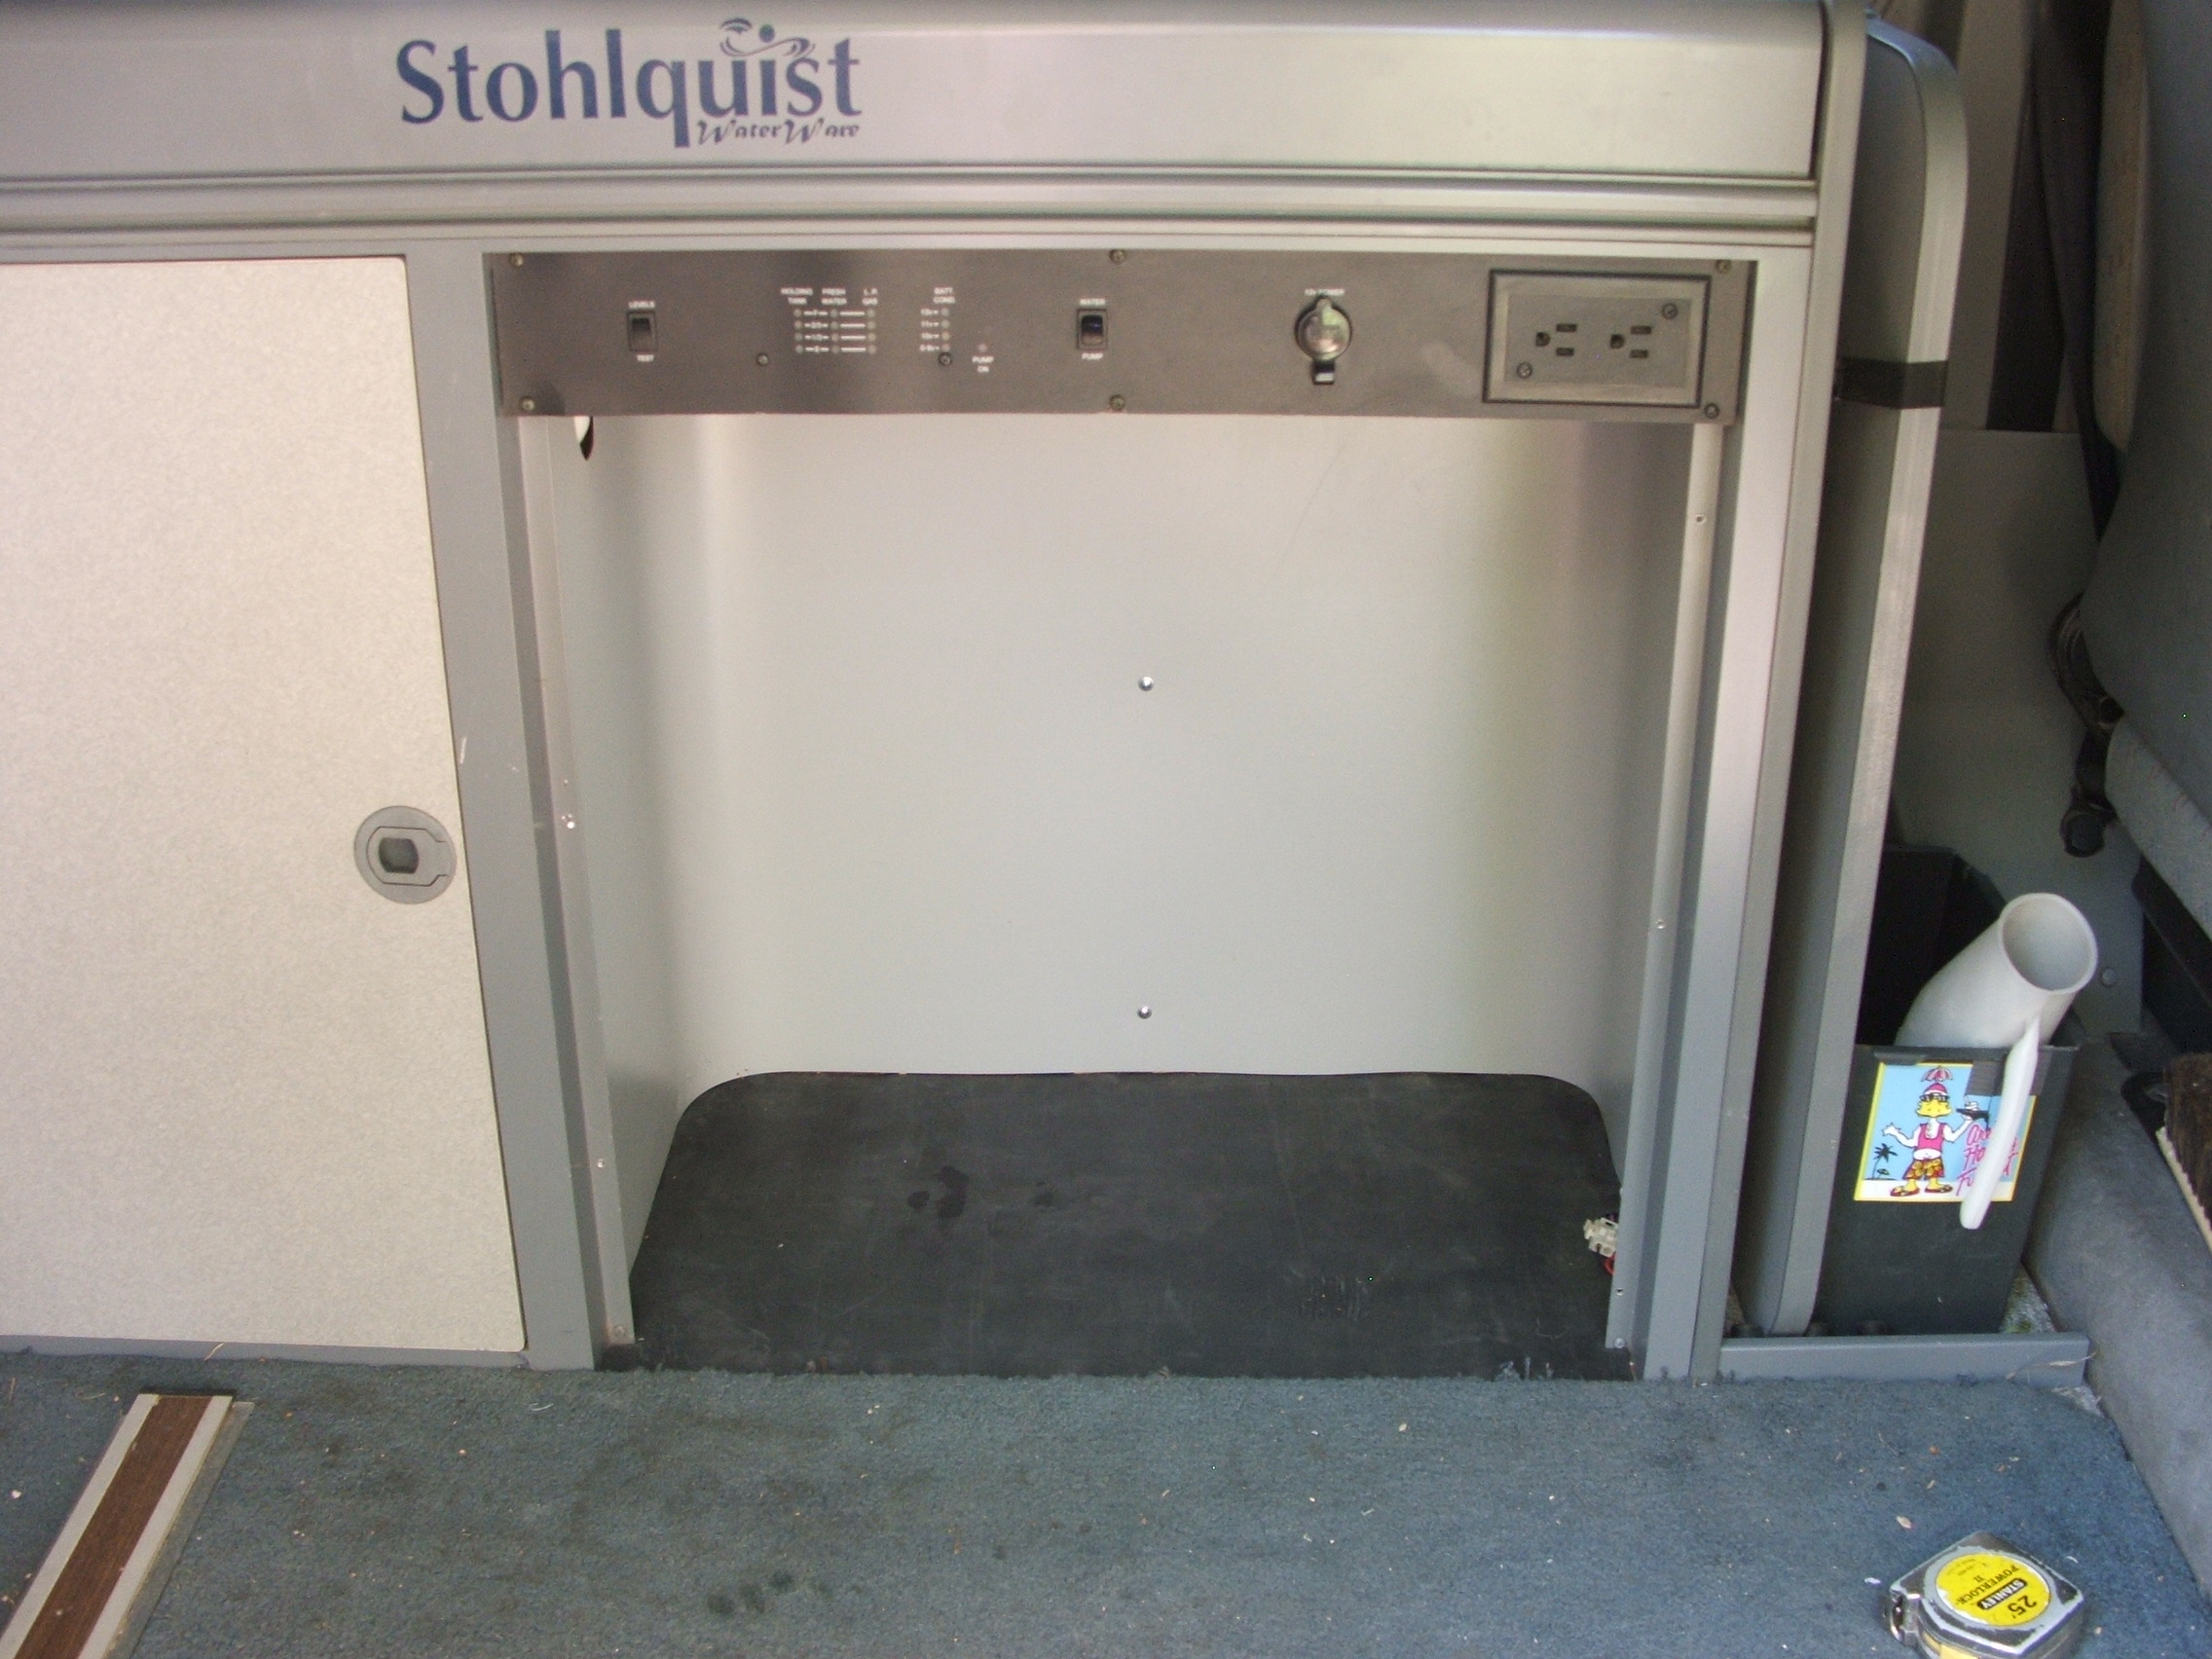
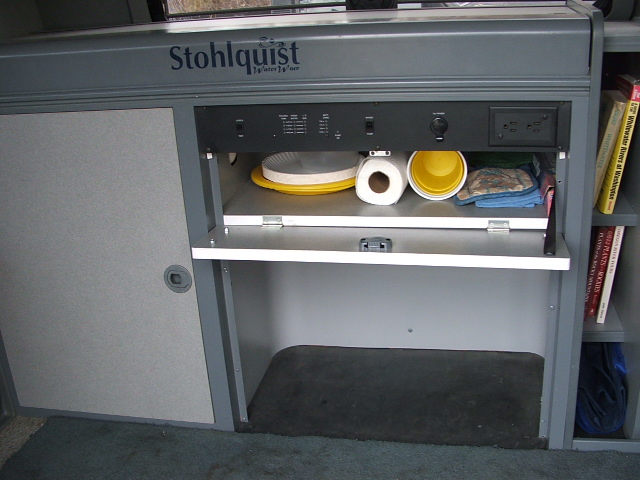
The cavity
after removing the fridge. |
| 
|
Reclaimed
1/2" plywood back....after plugging the propane line
that went to the fridge. |
| 
|
1/16" thick one-piece Kydex
"aviation" plastic screwed to plywood. (screws were
painted a matching dark grey after photo was taken).
This plastic is very easy to work with
and ultra tough. You have to make a concerted effort to mark
or scratch it. |
| 
|
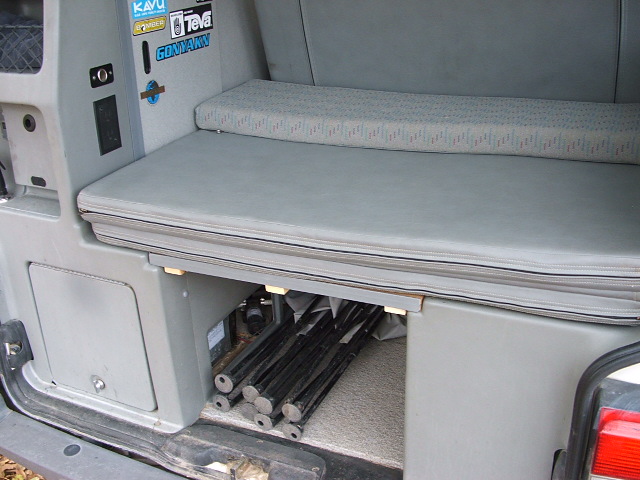
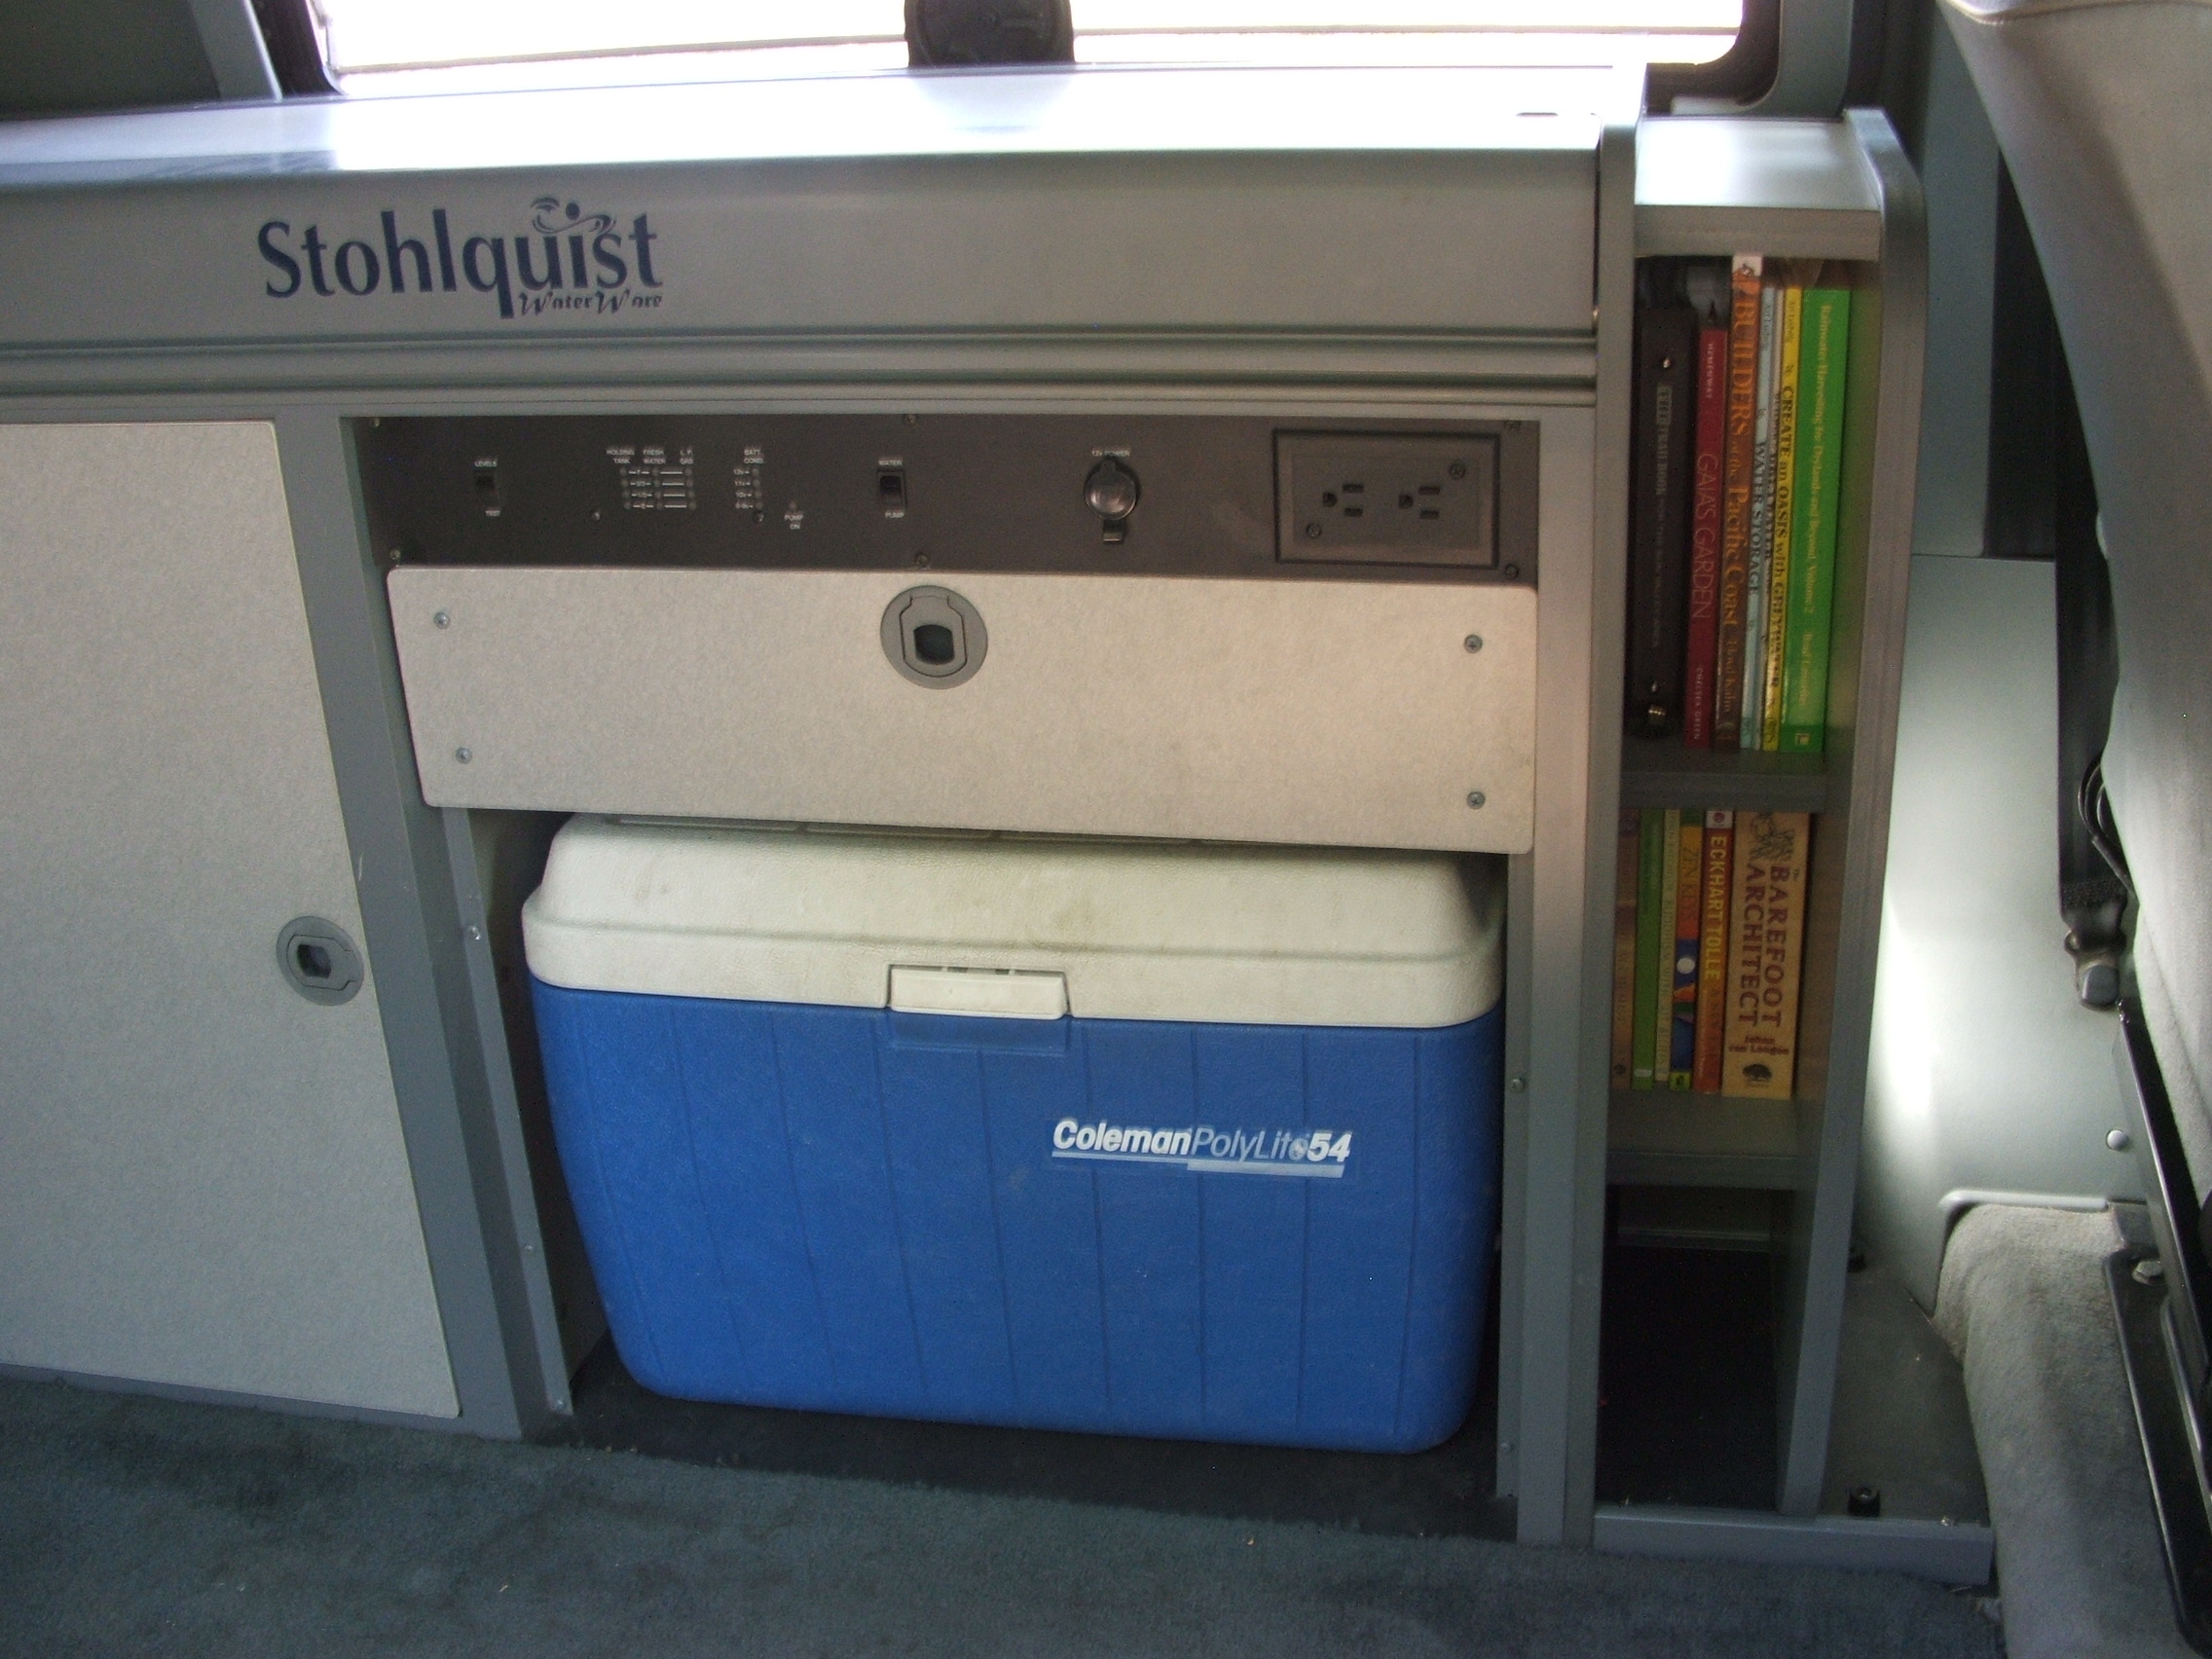
To maintain
a factory-like appearance, the bed platform from the back
of the van was cannibilized and used for the cupboard door
and shelf above the blue cooler. A pine platform was used
as a replacement. See photos below.
The cupboard latch for this
new cupboard door was taken from the galley lid. The second
lid latch was also removed and both holes were plugged with
black plastic plugs (see photo below). A low profile handle
will be installed on the face of the galley lid.
The bookshelves to the right
of the cooler and behind the drivers seat: The shelves are
pine with the Kydex plastic laminated to their tops. I trimmed
the face of these shelves with trim left over from the rear
bed platform I used for the cupboard door. The vertical side
is one of the original tables with hardware removed. The second
table (shown below) stands vertically against this...just
as it did stock.
I use the little cubby below
the bookshelves to store a small broom and the privacy curtain
that covers the windshield and door windows.
|
 |
In these photos, the floor in the two modified
areas is covered with black EPDM rubber roofing. I have since removed
the larger piece due to the cooler not easily sliding on it.
I also have a larger and better
insulated cooler that I take in addition to this blue cooler on
longer trips (Coleman 70 Quart Xtreme 5 Cooler). On shorter trips,
I'll leave the blue cooler at home and use the space for water jugs
and other items. The larger cooler rides behind the passenger seat
and is maneuvered as required. This 70 quart cooler has four cup
holders which I can access without difficulty from the drivers seat.
It also makes a handy sitting bench, inside or outside the van.
Over all, when on trips that do not necessitate extra food, I've
come to prefer this single and larger cooler method.
| 
|
Desk plug I used in place
of the original latch that I used for the new cupboard door. |
| 
|
Table
in its original location. It is held in place with a rubber
coated clamp of sorts that is fastened to the plastic side
panel. Difficult to describe but it has a spring-like action
to it that holds the table in place via pressure. It's very
simple. The table can be slid into place with one hand. |
| 
|
The grey trim from the original platform
was used on the rear most part of the new pine platform. |
|
This is how it looks with the sleeping
mat on top. |
| |
I removed the fridge vent cover and covered
the hole with an aluminum plate I cut from 1/8" stock.
It is sealed with EPDM rubber roofing. |
| |
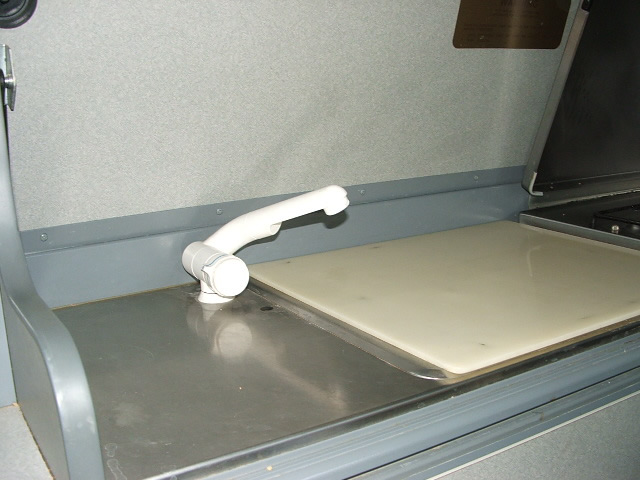
I also replaced the original faucet with
the newer model. The off/on switch is in the knob. In other
words, turn the knob and water appears. Just like at home. No
more fumbling around with the switch under the stove on the
galley face. A wonderful improvement! |
| |
$2 thrift store carbon ski pole converted
to a clothes rod. Each end was cut off then fastened to the
roof handles with one heavy zip tie per side. The ends are capped
with rubber caps. Works great for hanging/drying wet towels,
dishclothes, kayaking gear, etc. |
| Roof
Racks
A growing number of Eurovan
camper (I'm talking about Winnebago conversions here) owners
are reporting cracked pop top roofs. This makes for both a
challenging and expensive dilemma. Making a good and long
lasting do-it-yourself repair is beyond what many can or would
like to do. Most seek out a "professional" .....but
with the kind of expertise needed for this type of material,
they are few and far between. One used to be able to buy new
tops (rumor has it they are no longer available), but they
are, or were, up to $7,000. And that is not installed! A custom
top can be less but is still quite expensive. The best bet
here is to do everything you can to prevent, or at least minimize
the chances of cracking the top.
If I knew then (1996) what
I know now about the consequences of a broken roof, fear may
have led me to divise a hitch-mount system to carry my kayaks
rather than install racks. But here I am. I had yet to hear
of any horror stories about broken roofs... and though I knew
this roof's design left a lot to be desired, I had the input
from two different engineers (one of whom had a similar design
on his van) .... and drawings straight from Winnebago showing
how it was constructed. This allowed me to design accordingly
and install strategically.
Below is what has worked
for me thus far:
|
|
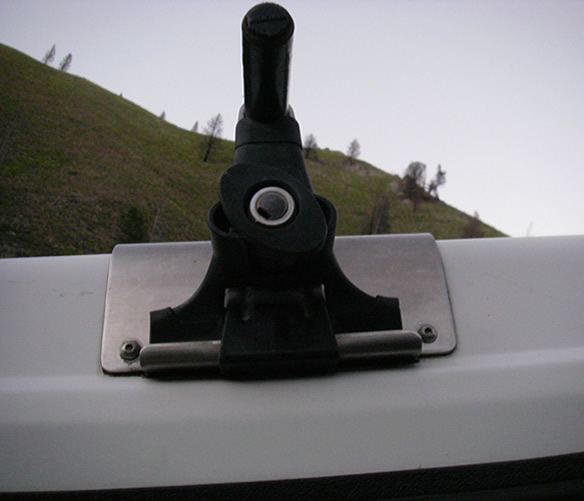
Standard Yakima
1A Raingutter rack attached to custom made 12 gauge stainless
steel bracket. The stainless brackets are strategically placed
to take advantage of the roofs stronger areas and mounted
with five 1/4" diameter stainless button head machine
screws with nylon lock nuts.
In addition to the five machine
screws, each stainless bracket wraps around the top of the
pop top for greater surface area to further spread the load.
EPDM rubber roofing is between each bracket and roof. |
|
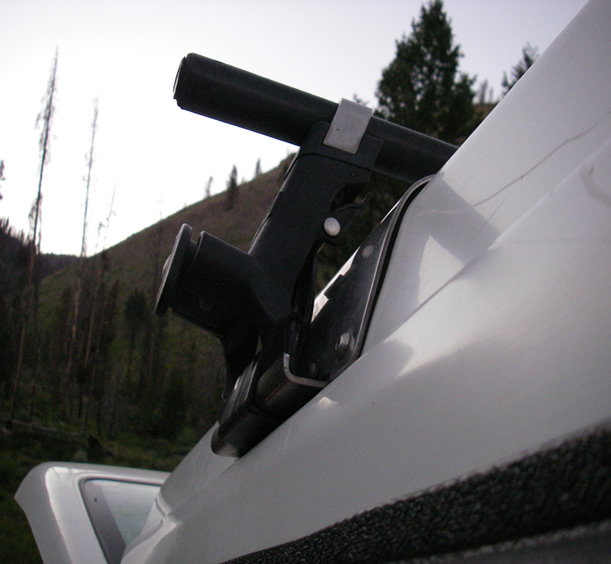
 |
Rather than standard "fender
washers" (large diameter washers) on the back side of
the pop top, stainless angles were used, bent to the contour
of the roof. The short piece of the angle on top is to reduce
the stress placed on the assembly caused by uplift while carrying
loads at highway speeds. The length of this angle plate is
several inches longer than the outer bracket. |
| In essence,
between the outer bracket and inner angle plate, a stronger
structural "sandwich" is created over the standard
aftermarket rack systems...in both dead weight and uplift.
I believe a greater surface area with this sandwich, and additional
screws, is key to preventing issues with this particular roof...along
with the noted areas below...and a bit of luck.
Potentially important
notes:
1) I always
have a rectangular car camping sleeping bag spread out on
the upper bunk bed. This old synthetic bag eliminates the
gap between bed and ceiling, creating a snug fit and minimizing
potential sagging and bounce leading to, or expediting issues
with the pop top (ALWAYS have the upper bunk folded out, as
if it were when being slept on, when latching the top down
in its driving position).
2) I use
the same strength struts as the originals rather than the
stronger versions often recommended for popping the top with
loads on. If using the stronger struts and nothing is on the
roof (ie, weight), more pulling force will be required to
lower which will put additional strain on the roof. That said,
I NEVER lift the top with anything strapped to or fastened
to the roof. Yes. I've seen many owners of
the older VW Westfalias do it. I did on my old Westfalia too.
They are completely different roofs though. The older Westfalia
roofs are very well designed and strongly built.
3) I use
a tight fitting cut down wooden broom handle to prop the top
up, in the center by the seat belt-like latch. While fresh
struts hold the top up fine without this broom handle, the
structural design is so weak that the front section of the
top sags from the strut mount forward. That cantilever is
simply too great for this particular roof, putting unnecessary
stress on an already strained design. The broom handle taking/sharing
the strain will likely give the struts more life too.
4) Lastly.
When lowering the pop top, rather than pull down on the two
interior handles to latch the roof, I lower the roof, step
outside, and pull down from the top, on each side, until I
hear the two recommended latching "clicks". I do
this primarily to mininimize the strain on the weak handle
attachment, since the sleeping bag mentioned above makes latching
the roof a little more difficult.
Though I rarely exceed 60
MPH, I have carried anywhere from one to three whitewater
kayaks (38-55 pounds each) on this roof for 82,000 of its
112,000 miles, many times over rough washboardy gravel roads,
without a single problem. On 2-3 occasions, I carried as many
as four kayaks weighing 50 pounds each... but for distances
of less than 75 miles each time. I have also carried a single
12' long tandem kayak weighing ~90 pounds for ~800 miles.
Lastly, due more to my lack of storage space at home rather
than needing it on the van, I had a longish rocket box on
top for ~1-2 years. Empty, it only weighs around ~35 pounds.
I had up to 30 additional pounds in it for several hundred
miles.
Some believe that sun exposure
and locale (freeze/thaw cycles) plays a role in the longevity
of these particular roofs. It may, or may not. This van has
not seen the inside of a garage since 1996 (it sits in the
shade a good part of the day, however) and resides in temperate
South Central Idaho.
Best of luck if you decide
to add racks to yours! They are awfully handy to have.
Luggage
Tray
Like the roof, the Winnebago
luggage tray leaves a lot to be desired. Even that may be
an understatement, as its over all design is so poor, it
is pretty much guaranteed that every owner will experience
issues with it. This will be with the tray
directly, or the cab it sits on or... most likely,
both...whether the tray is used or not. Not only is it prone
to cracking, the flimsiness of the plastic, combined with
fragile brackets, allows the tray to move enough on the cab
to wear the paint off. This, coupled with a design that allows
debris to enter yet not easily escape creates a build-up of
gunk under the tray ultimately leading to rust and worse yet,
broken brackets. There's a growing number of hapless drivers
who have lost their trays while driving down the highway.
If your tray flies off, and it is damaged beyond repair, assuming
you can even get it back...expect to pay around (including
shipping and seal) $650 for a new one from Gowesty. Worse
though is what could happen in traffic when the luggage tray
becomes a large projectile. Though I am not aware of flying
trays causing any serious accidents, I believe it is not only
prudent to be preemptive, it is of moral obligation.
Please. Address your luggage tray.
There are a number of areas
on the tray and cab that should be given attention.
Addressing only one or a few of these areas will not solve
the issue as a whole. Each area should be remedied.
Below is what I suggest:
Note: This is for the 1995
model. There were some changes to the outer brackets in the
later years which I am not as familiar with. I still recommend
investigating and taking corrective measures as needed.
1) Remove
the tray and flimsy brackets mounted to the cab, clean the
debris off the cab, sand, prime, and paint rusted areas
2) Replace
the brackets you removed in step one with the "stainless
luggage rack brackets" from Gowesty. This will set you
back $80.
3) Place
a couple washers between the two outer brackets and the tray
to lift the corners a little off the cab or, better yet, do
as I did in step 4.
4)
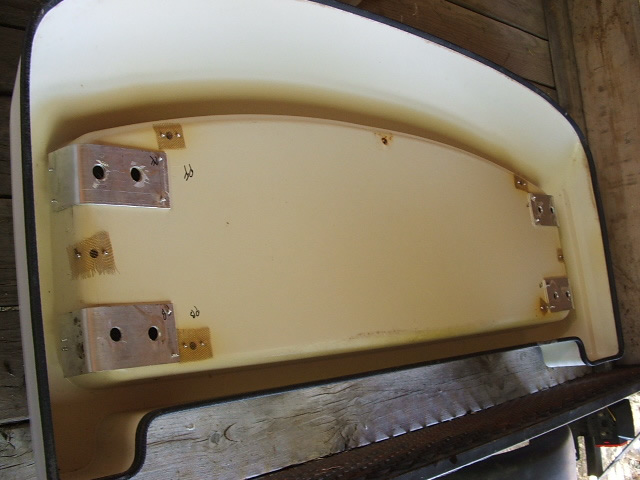
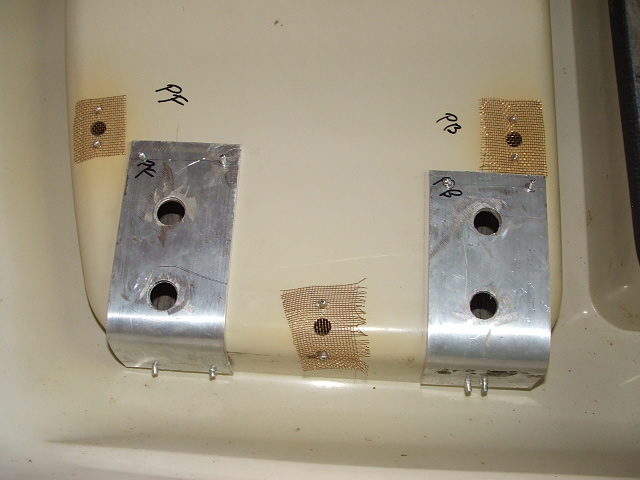
I reinforced the area of the tray prone to cracking with 1/8"
aluminum plate as seen in the photos. The plates are riveted
to the tray.
5) Install,
from the underside, rust resistant screen over the drain holes
to keep larger debris from getting under the tray. The washers,
or aluminum reinforcement in my case, lifts the corner of
the tray off the cab enough to allow the smallest debris to
escape.
6) With
a grinder, round the corners off the front outside edges of
the exterior tie-down brackets that hold the tray to the top
of the van. The stock brackets do not fit the contours of
the plastic luggage tray leaving the sharp corners to dig
into the plastic, ultimately leading to cracks. See photo
below.
7) Seal
the back of the tray where it meets with the cab. See last
pic below.
Having worked on this area
many times over the last 27 years, I have come to view the
tray as a fairing and esthetic compliment to the pop up roof
more than something of much practical use. At most, I use
it to to carry a small bag of stinky garbage to the nearest
dumpster or a pair of wet swim trunks when I wish to expedite
their drying. Carrying much of any weight, or something tall
enough to catch the wind which can cause undue vibration,
increases the chances of issues arising. Like the pop up roof,
this luggage tray is not anywhere close to being as robust
as those on the earlier Westfalia camper vans. Treat it accordingly.
 |
 |
| The
underside of a modified luggage tray. |
| |
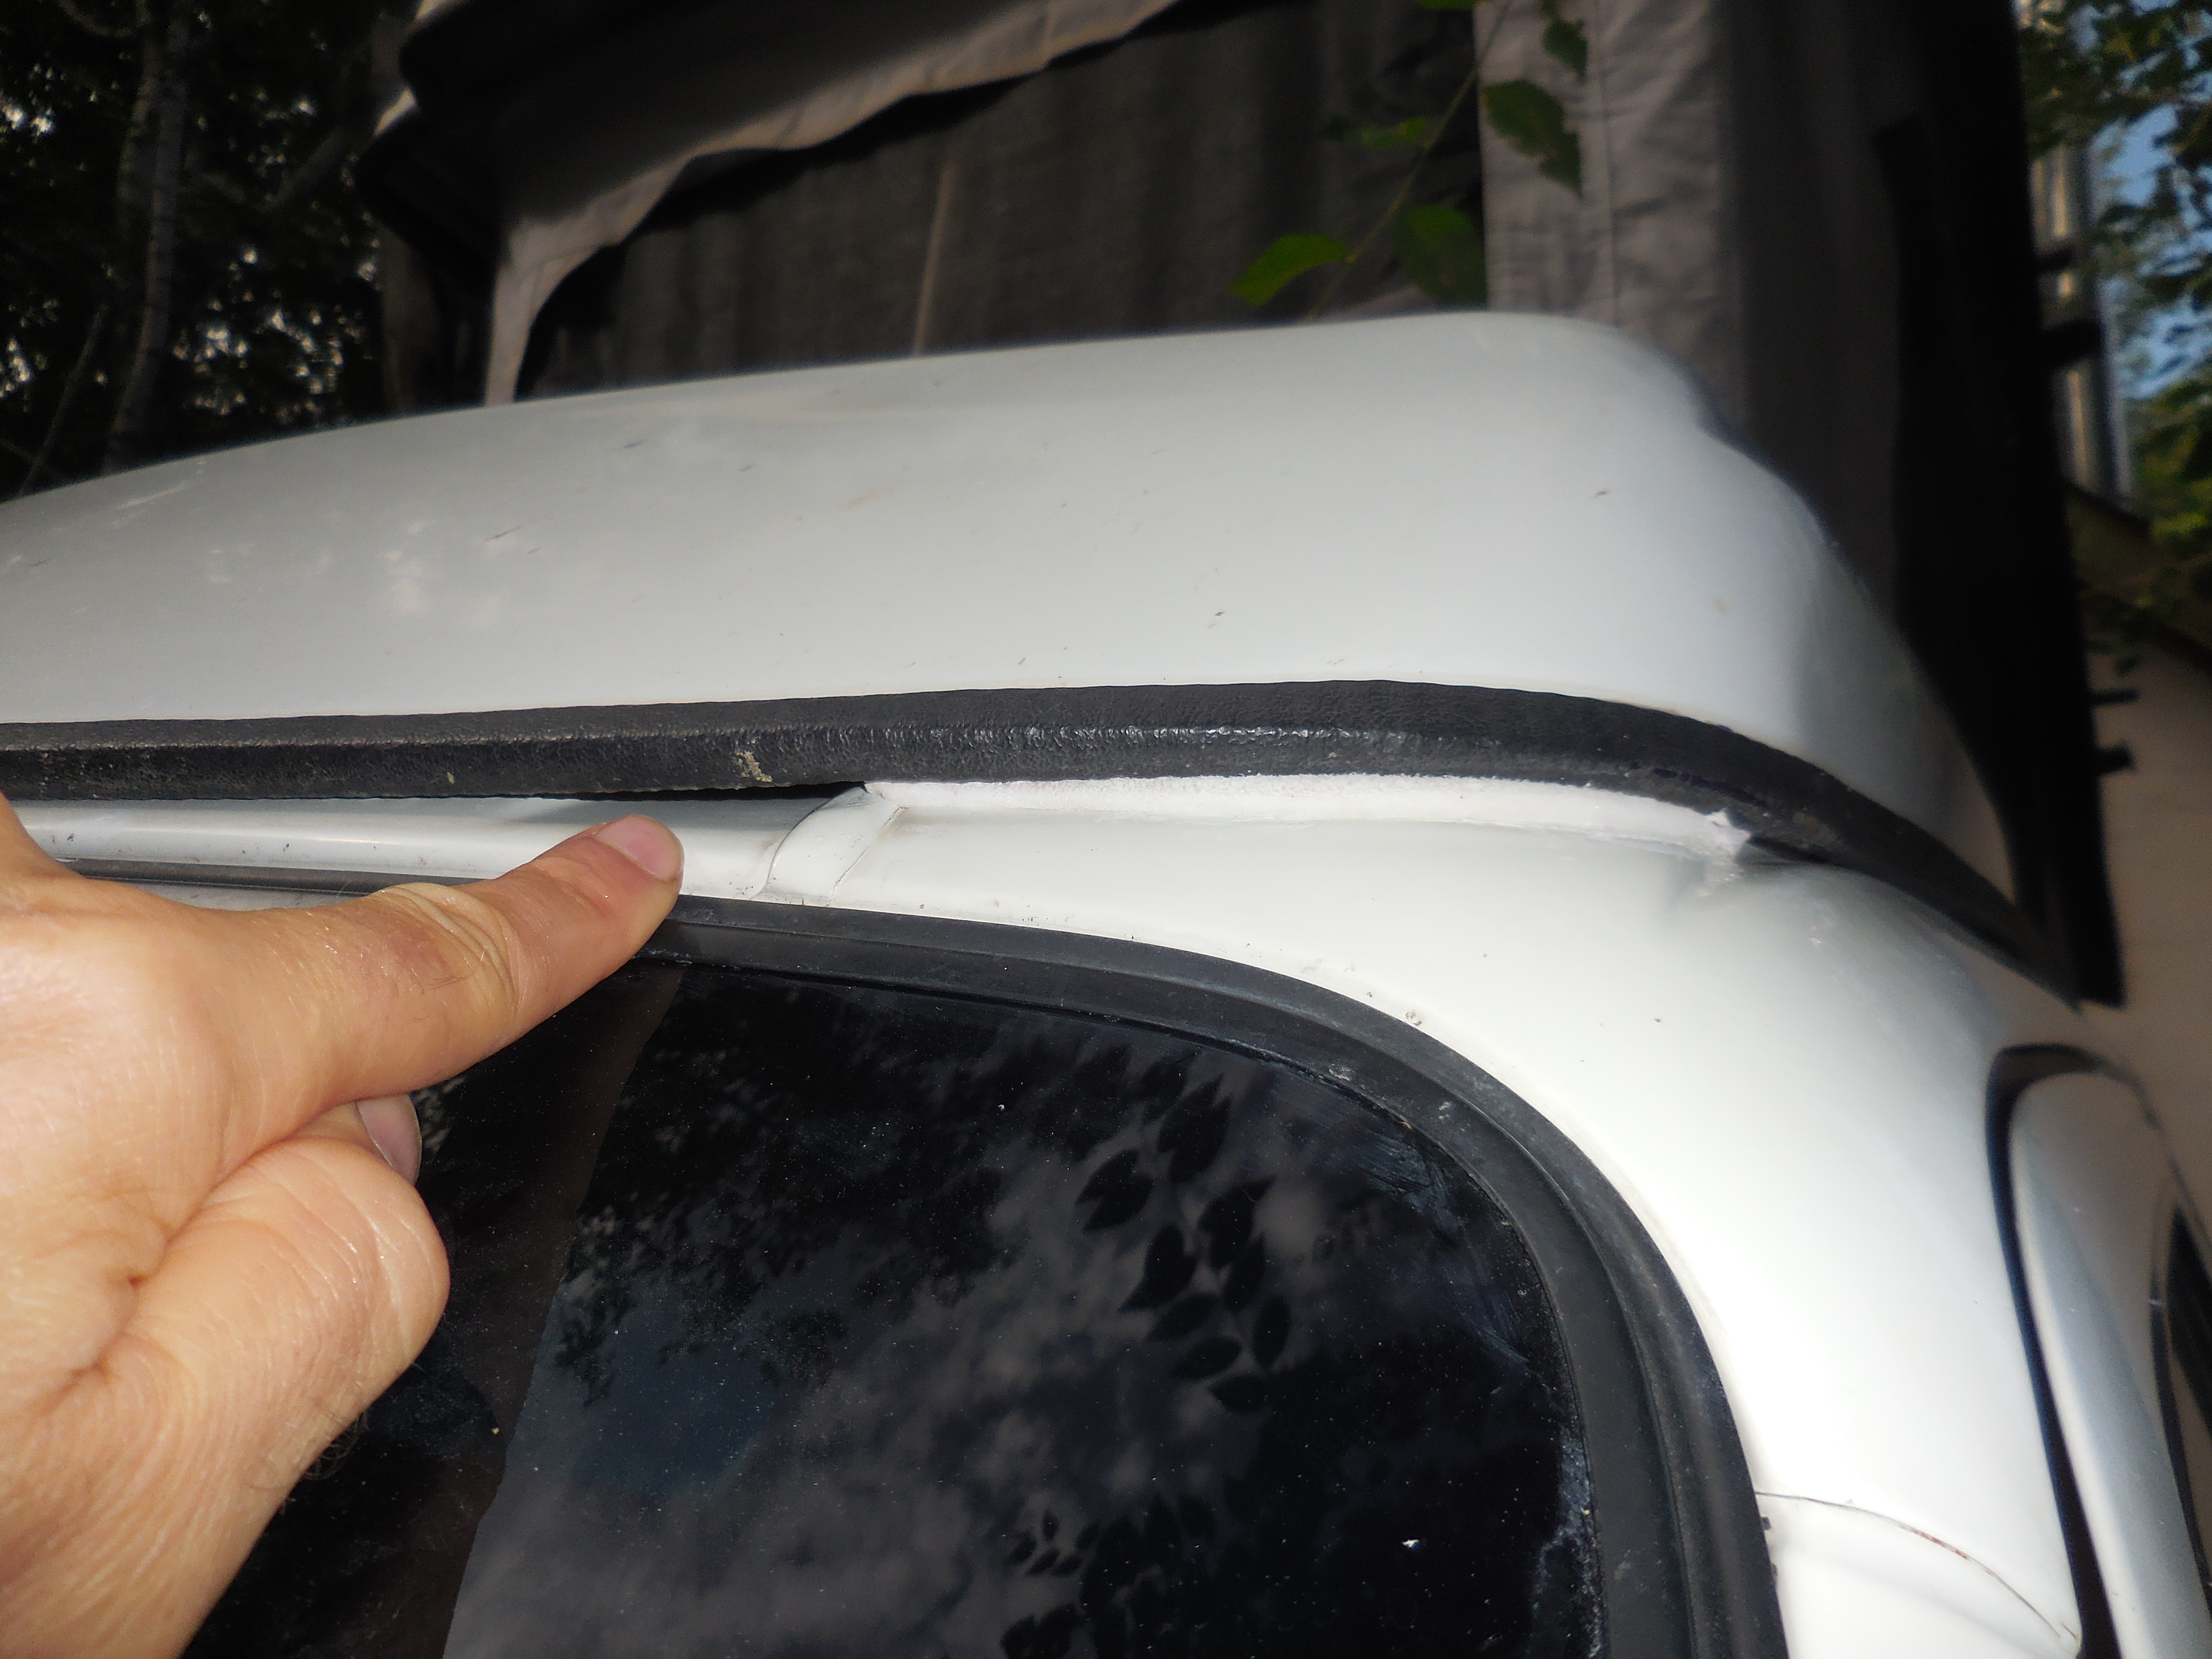 |
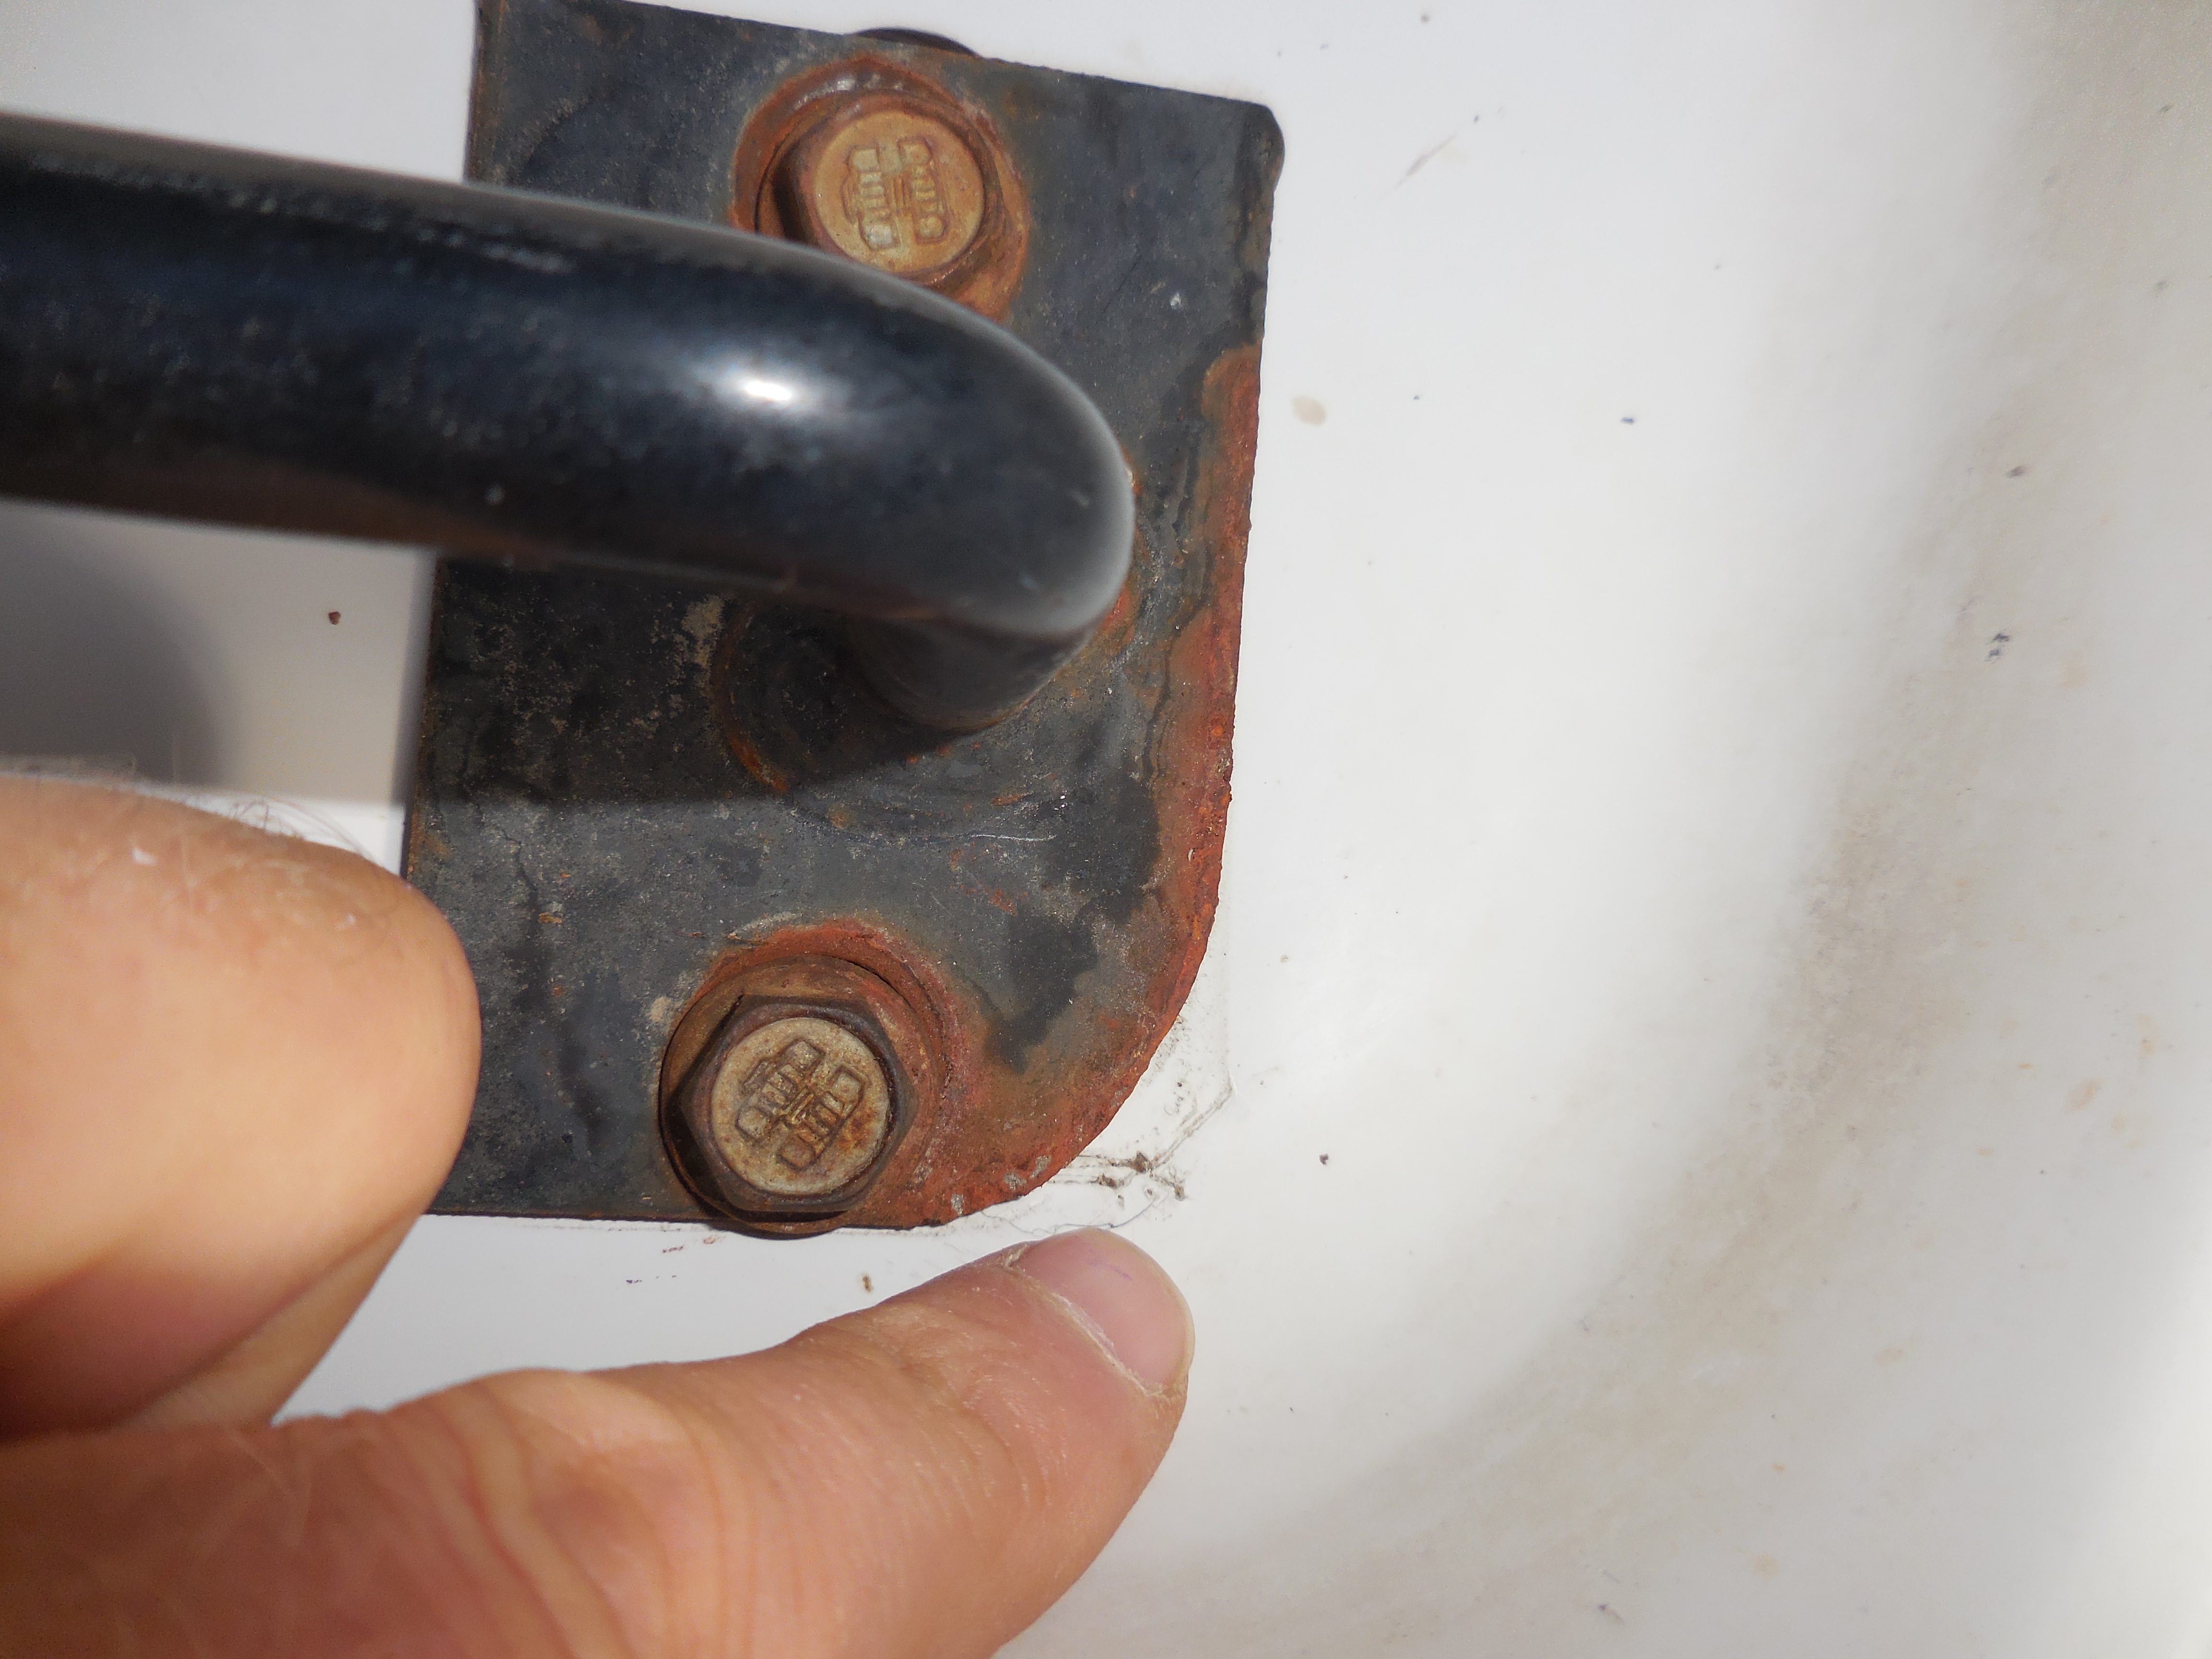
| Note
that the corner of the bracket has been ground off. Note
also my finger pointing to damage created by the orginal
sharp corner of said bracket. The aluminum plates installed
under (as seen in pics above) reinforces this entire area. |
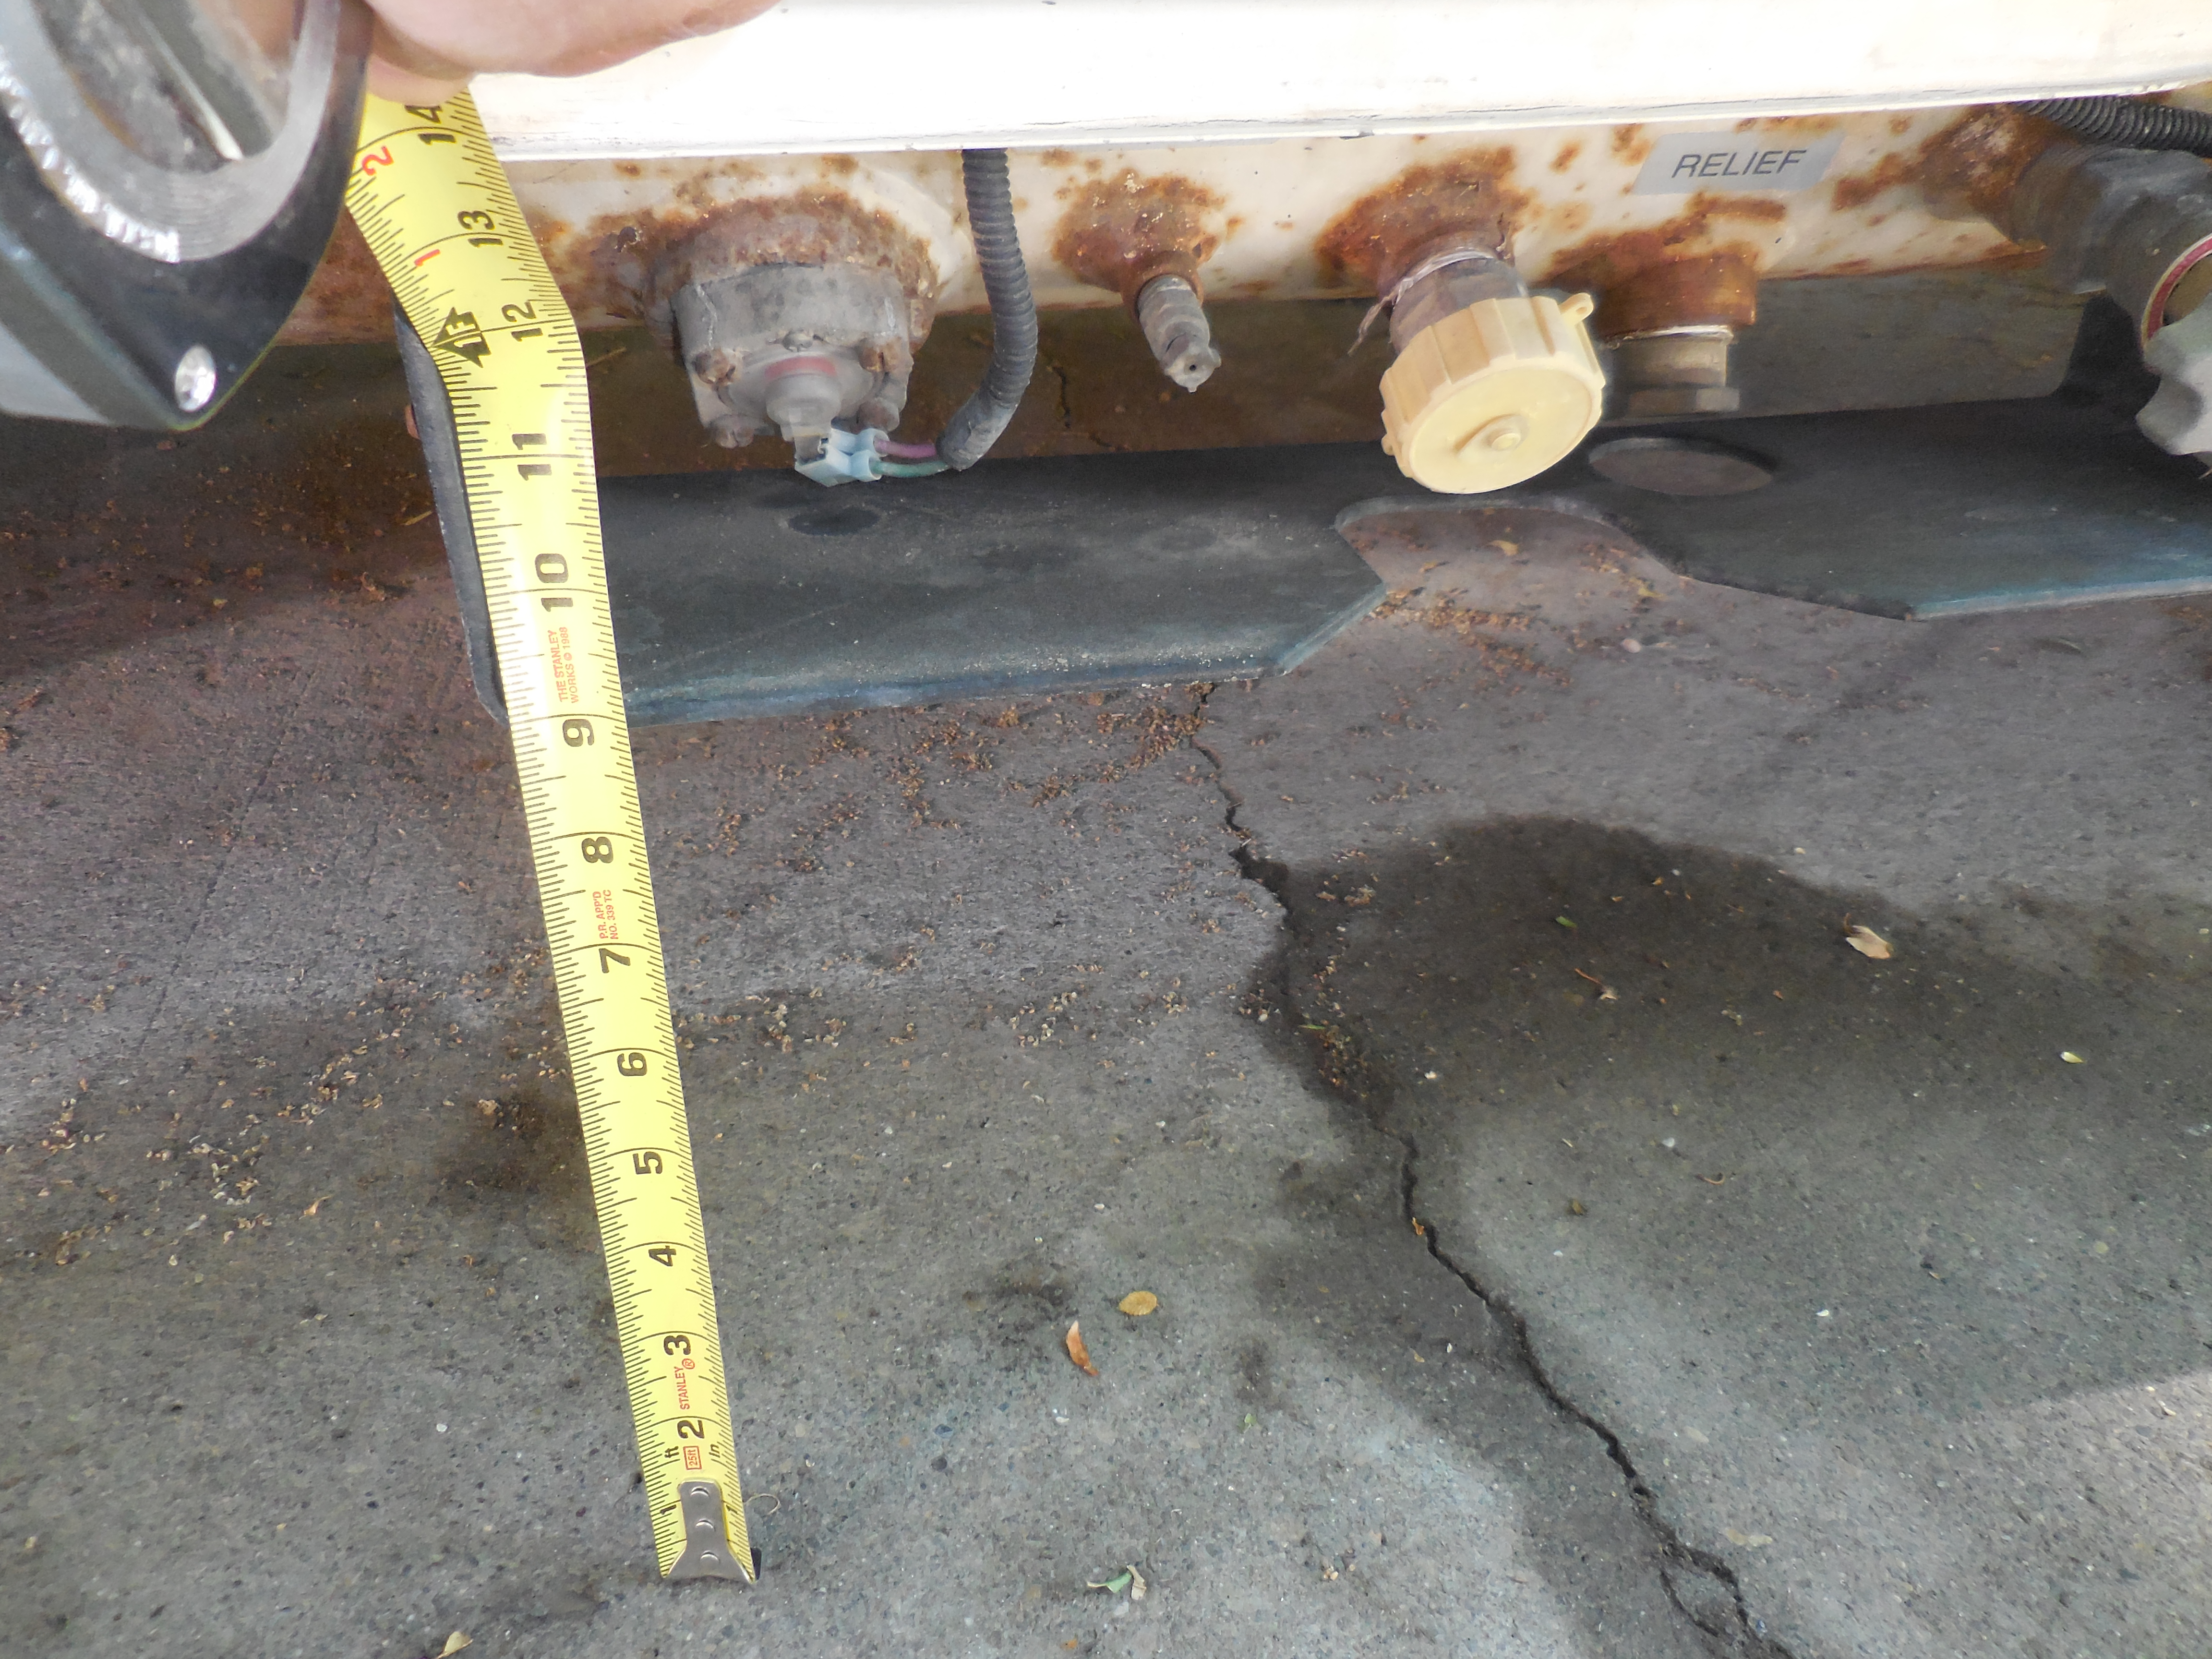
Water coming from the drain
holes on the top of the tray exits through the slot I'm
pointing to (one each side of tray). By lifting the tray
with washers, or the reinforcing plates as in above pics,
these drains can more effectively drain any debris that
enters. Note the white foam in the corner between tray
and cab. This keeps the tray off the metal where it normally
vibrates, rubbing the paint off the cab creating rust. |
| |
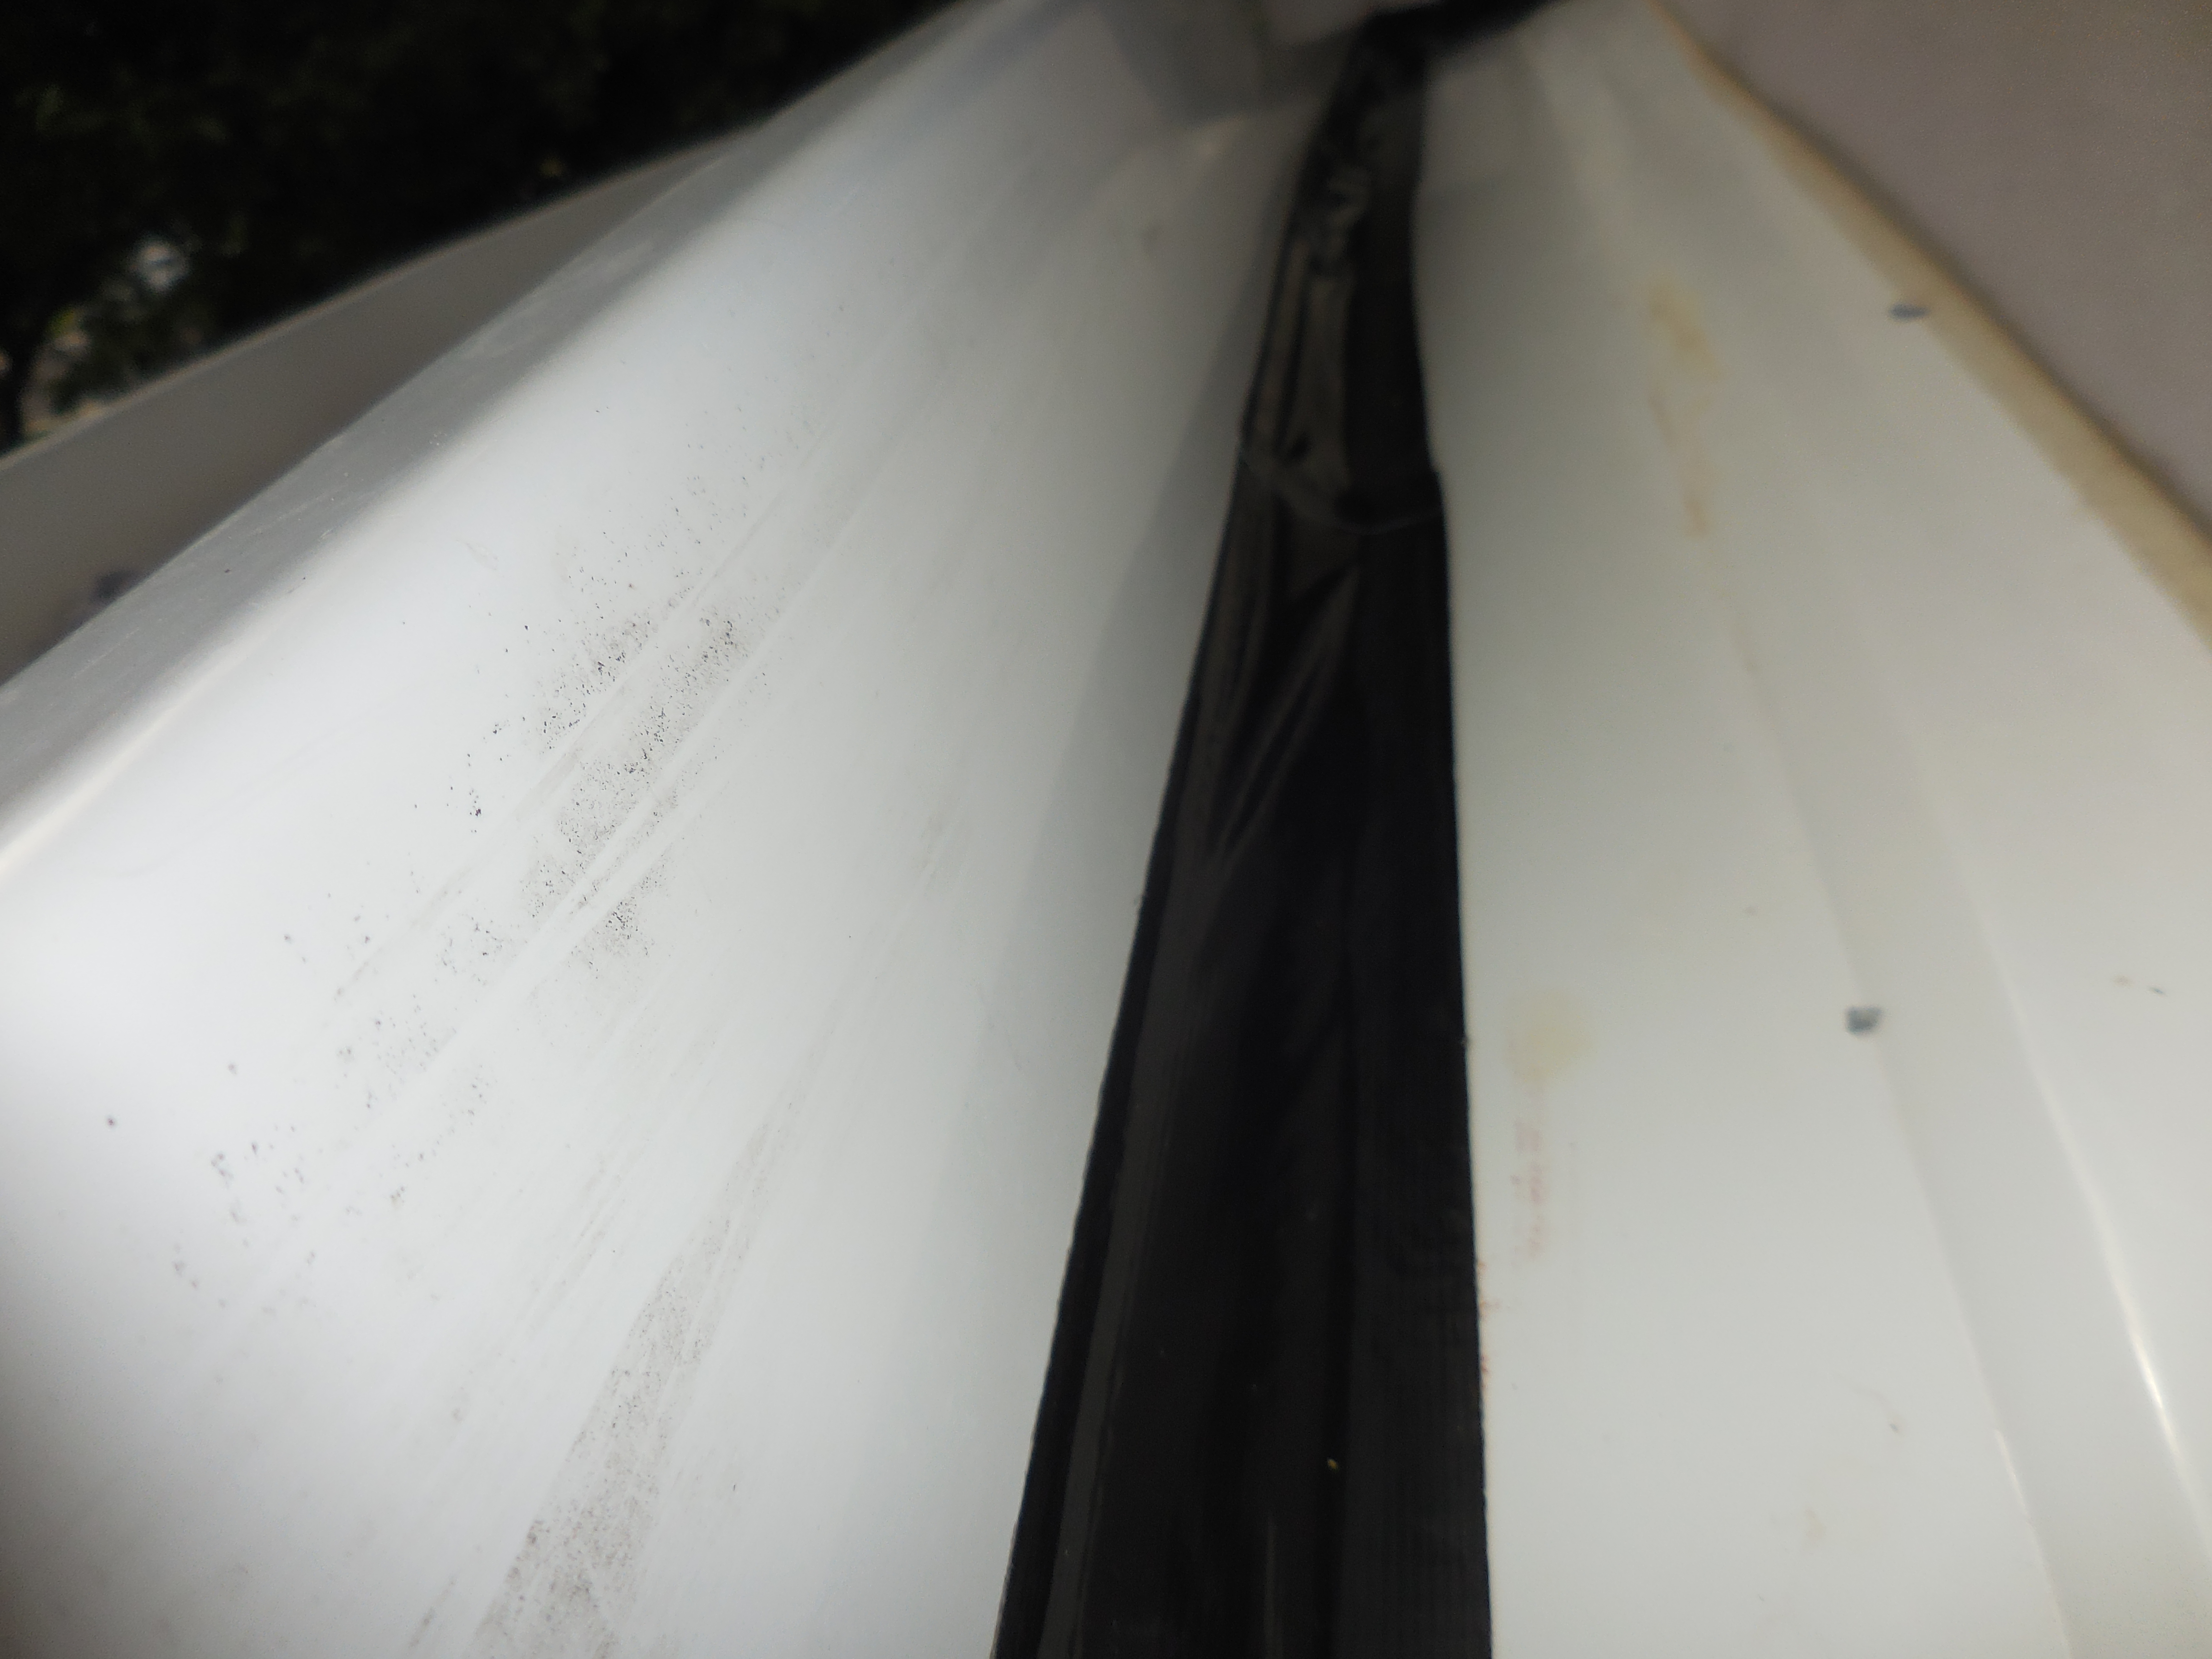
The pic to the left is
looking at the rear side of the luggage tray with the
top raised. Naturally, the space between the tray and
the top (when down) accumulates debris. Even though there's
trim on the tray, the seal is not good and some of this
debris inevitably finds its way under the tray where it
can build up. To prevent debris from entering, I sealed
the gap between the bottom of the tray and the cab with
Gorilla tape as shown in the pic. It does not sound like
an overly sexy fix but, it is not visible and with some
care, can be made to look fairly decent. More importantly,
it works, and is easy and inexpensive. The tape will need
to be replaced every few years. |
|
Lifting The
Van For Extra Clearance
a different and less costly
approach
Had I known
how much better the following modifications would make this van,
I would have done them in the first days of ownership. The difference
in cornering and how it handles bumps is substantial! And the extra
clearance has saved me a lot of grief as well as opened the doors
to where I can drive it. If you are familiar with the pitfalls of
the early Eurovan tire and clearance issues, you can cut through
the chaff by skipping the next 3 paragraphs. If not, read on.
There are several things
that hampers this van's handling and severely limits where it can
be driven. The front end sags over time which, can drop its suspension
travel so much to not even be able to handle a small bump in the
road without bottoming out. The shocks are also too soft for a vehicle
of this size and weight, front and rear. However, for me, the biggest
issue was the lack of clearance on the propane tank. Dragging it
became a thing of common occurrence and many dirt roads I wanted
to travel were simply out of the question. I was even dragging the
tank's shield on not-so-aggressive speed bumps and during one incident,
incurred some fairly heavy damage by running over a curb hidden
in the snow.
Besides the sagging front
end, the 15" wheel size (1995 and earlier Eurovans) also contributes
to the poor clearance. The wheel size creates another dilemma as
well. Due to the weight of the van, tires of special load ratings
must be used. Unfortunately, the selection of appropriate 15"
tires with the same specs as stock is extremely small. What few
are available are expensive yet have poor longivity (I was getting
as few as 25,000 miles out of my pricey Goodyears). People wanting
to address these issues have been upgrading to 16" wheels and
tires. This gives extra clearance and provides a wider range of
tire options to choose from. The downside is the expense involved
in buying 16" wheels. The do-it-yourselfer can save some cash
by finding a used set from another vehicle...but there's the challenge
of finding wheels that will have the same lug pattern, the correct
off-set, and proper load rating. After considerable thought, research,
and hair pulling, I ended up taking a different approach that wasn't
only effective, it saved me a big wad of cash. I found a tire that
will fit the stock 15" rims yet is practically the same height
as the 16" people are converting to. It achieves this by having
a taller sidewall than the stock tire. Exceeding the recommended
load rating, the sidewall is so stiff, it does not give the expected
sensation of "rolling" in corners. More on these tires
below.
Lastly, most of the camper
add-ons to these vans are on the drivers side. Consequently, that
side of the van is more weighted down which causes it to sit lower
than the passenger side. I don't know why Winnebago did not bother
to level them but most report the difference to be ½",
and that is what I found on mine.
The most common fix to
these above issues is the Gowesty "Eurovan Full Camper Lift
Kit" consisting of new 16" wheels and tires, heavy duty
shocks, and coil spring lift spacers. I believe this kit to be quality.
However, at $2420, which doesn’t include the cost of installation
or shipping, it isn’t a practical option for some. Below
is a different approach that addresses all the same issues for $1260
(I did the lifting and shock installation myself - easy with basic
tools and some mechanical inclination).
- Nokian 215/70R15 cLine
Cargo tires. These surpass the recommended load ratings for this
van and are only 1/4” shorter than the 16” tires included
in the GoWesty kit. This means you can keep your stock 15"
rims (saving you $800), get nearly the same height as a 16"
tire, and have a high quality and long lasting tire (reportedly)
to boot! $660, installed.
- One would think
the extra height in the sidewalls on these 15" tires
would create mushy corner handling. Thier stiffness minimizes
this. Combined with the new shocks, the van corners considerably
better than it did stock. As another note, besides being known
for making quality tires, Nokian is a pioneer of environmental
friendliness in its field.
- Bilstein HD shocks
from Cave Van. While the ride over washboards is slightly firmer
with these over the stock shocks, they make such an improvement
in every other way that they should be considered a must. Do not
do these other modifications without the HD Bilsteins! Raising
the van and leaving the stock shocks on could lead to dangerous
handling characteristics. $500 with shipping.
- Polycarbonate lift
spacers for the rear – 1” thick on drivers side and
½” on passenger. I made my own from material given
to me by a friend. Others have successfully made theirs from plastic
kitchen cutting boards. They are simple and very easy to make
with a jig saw. Cavevan also sells a set of two for $60.
- Adjust the front torsion
bars to raise the sagging front end. It's as easy as crawling
under the van and turning two nuts. Contrary to what some claim,
a special tool is not required for this. I easily
made the adjustment with my 14” adjustable wrench and saved
myself $30.
- Front end alignment.
$50 at my local shop.
- Spare tire. For this
vehicle, having the spare match the load ratings of the other
tires is what I recommend. However, viewing the spare as an emergency
item only, used to limp (drive slowly) straight to the
tire repair shop, I purchased the least expensive tire I could
find. $50
- Note: Due to the
larger diameter of the 215/70R15 not fitting in the stock
space, I had to cut a small amount of the non-structural cross
member out. After that, a simple adjustment was made: The
bracket VW uses to hold the tire in place is adjustable to
accomodate larger tires so, other than pulling the existing
pin and placing it in another hole, no modification was necessay
there.
|
| I
raised the front of the van so it was level with the rear.
I like this look when not loaded. However, when the fresh
water tank is full, and there's misc camping equipment
in the back, the rear sits a little lower than the front.
One can compensate by not raising the front as high as
the back... but, some ground clearance would be sacrificed
at the propane tank. (van is unloaded in this photo) |
| |
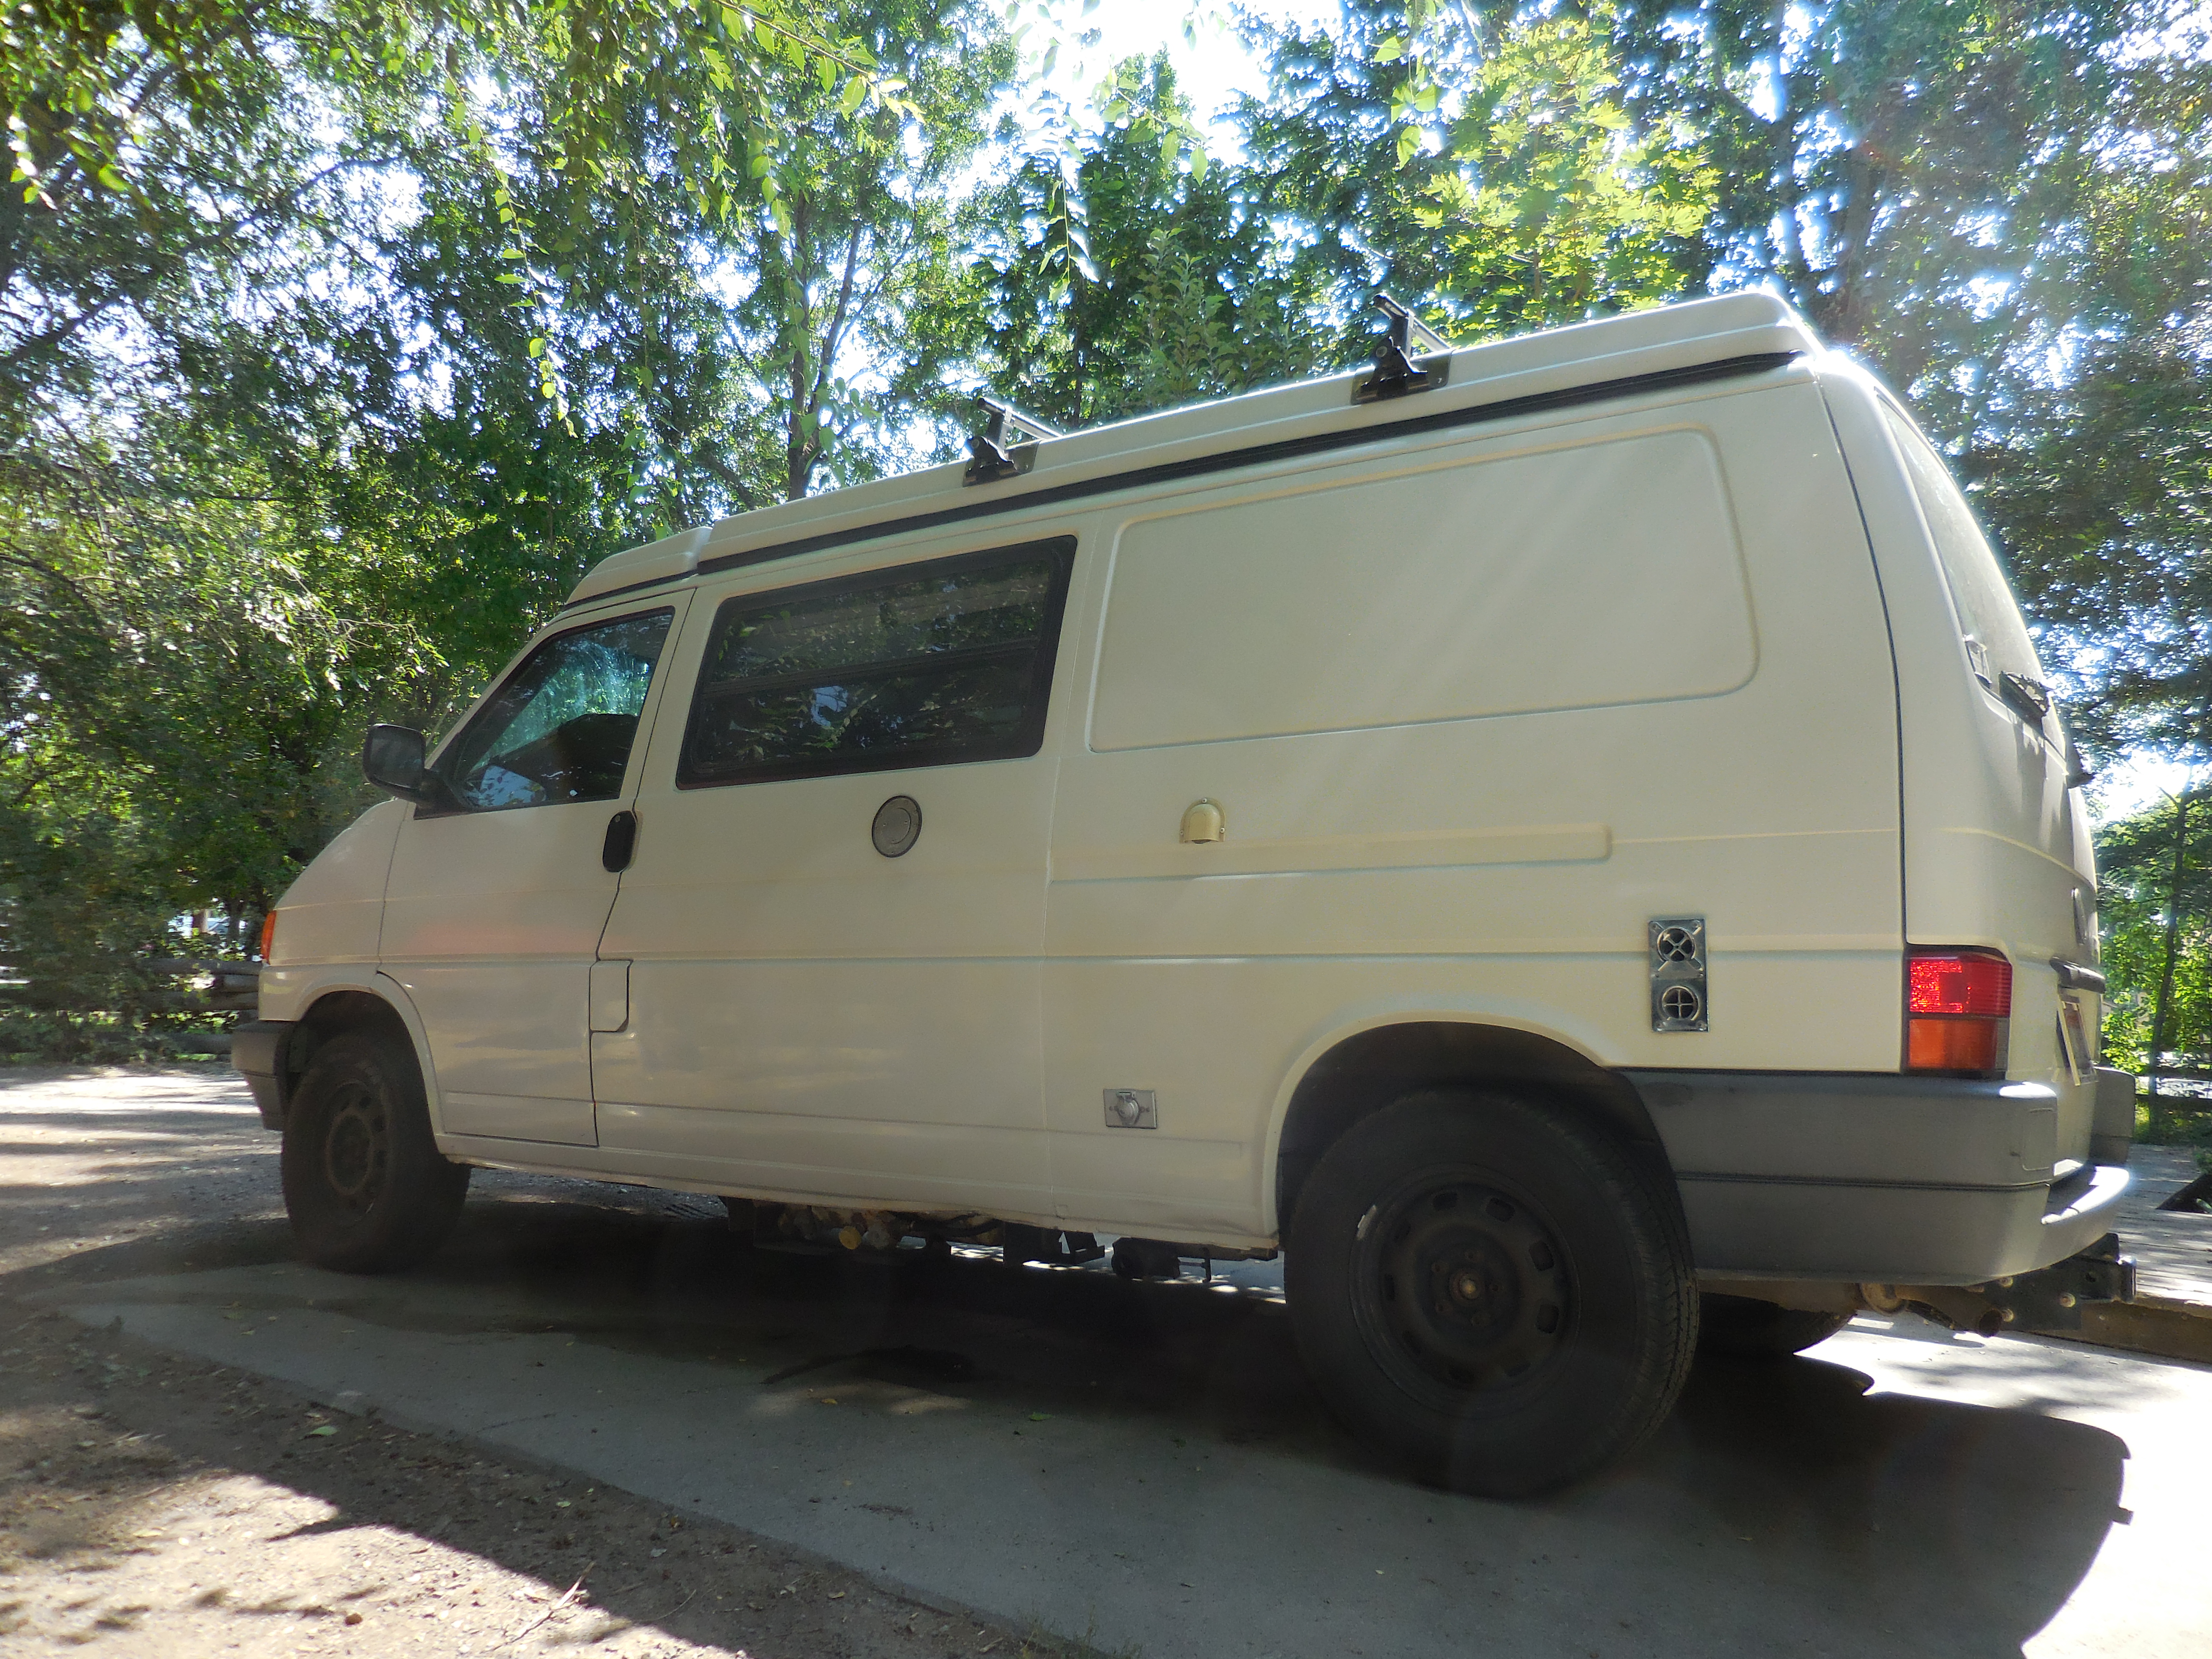
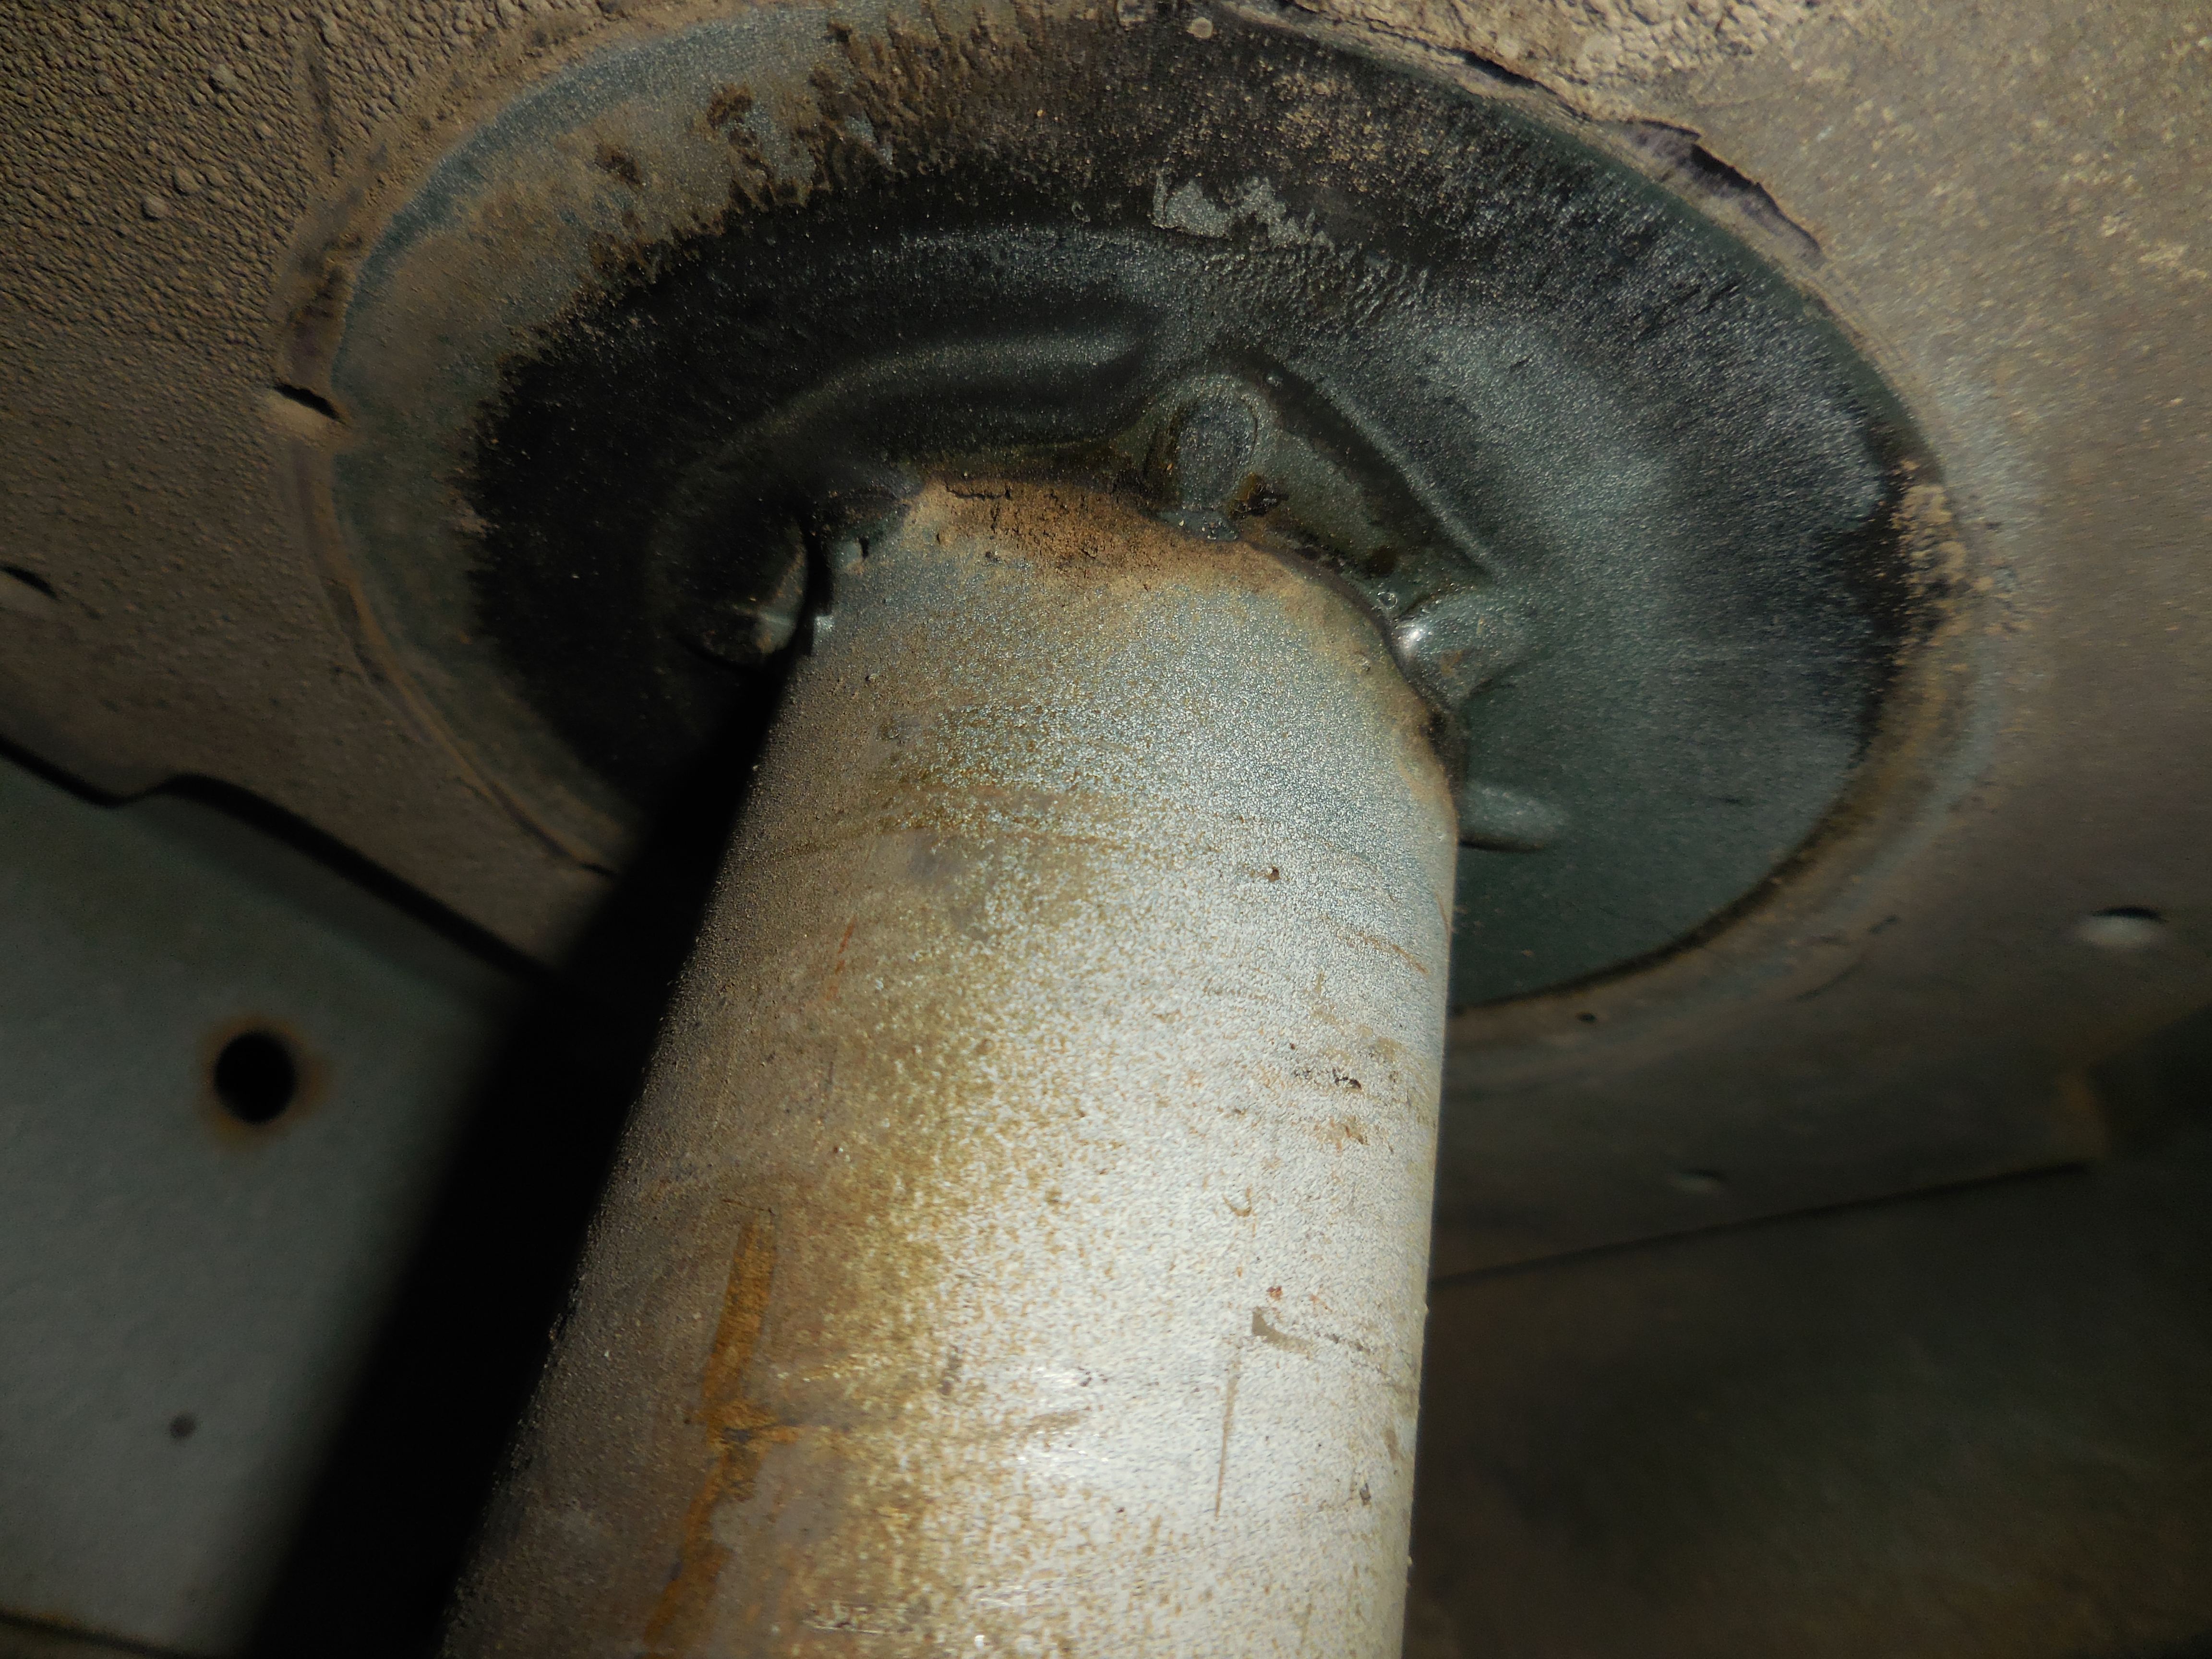
Post
lift at the propane tank: Three extra inches of much needed
ground clearance! |
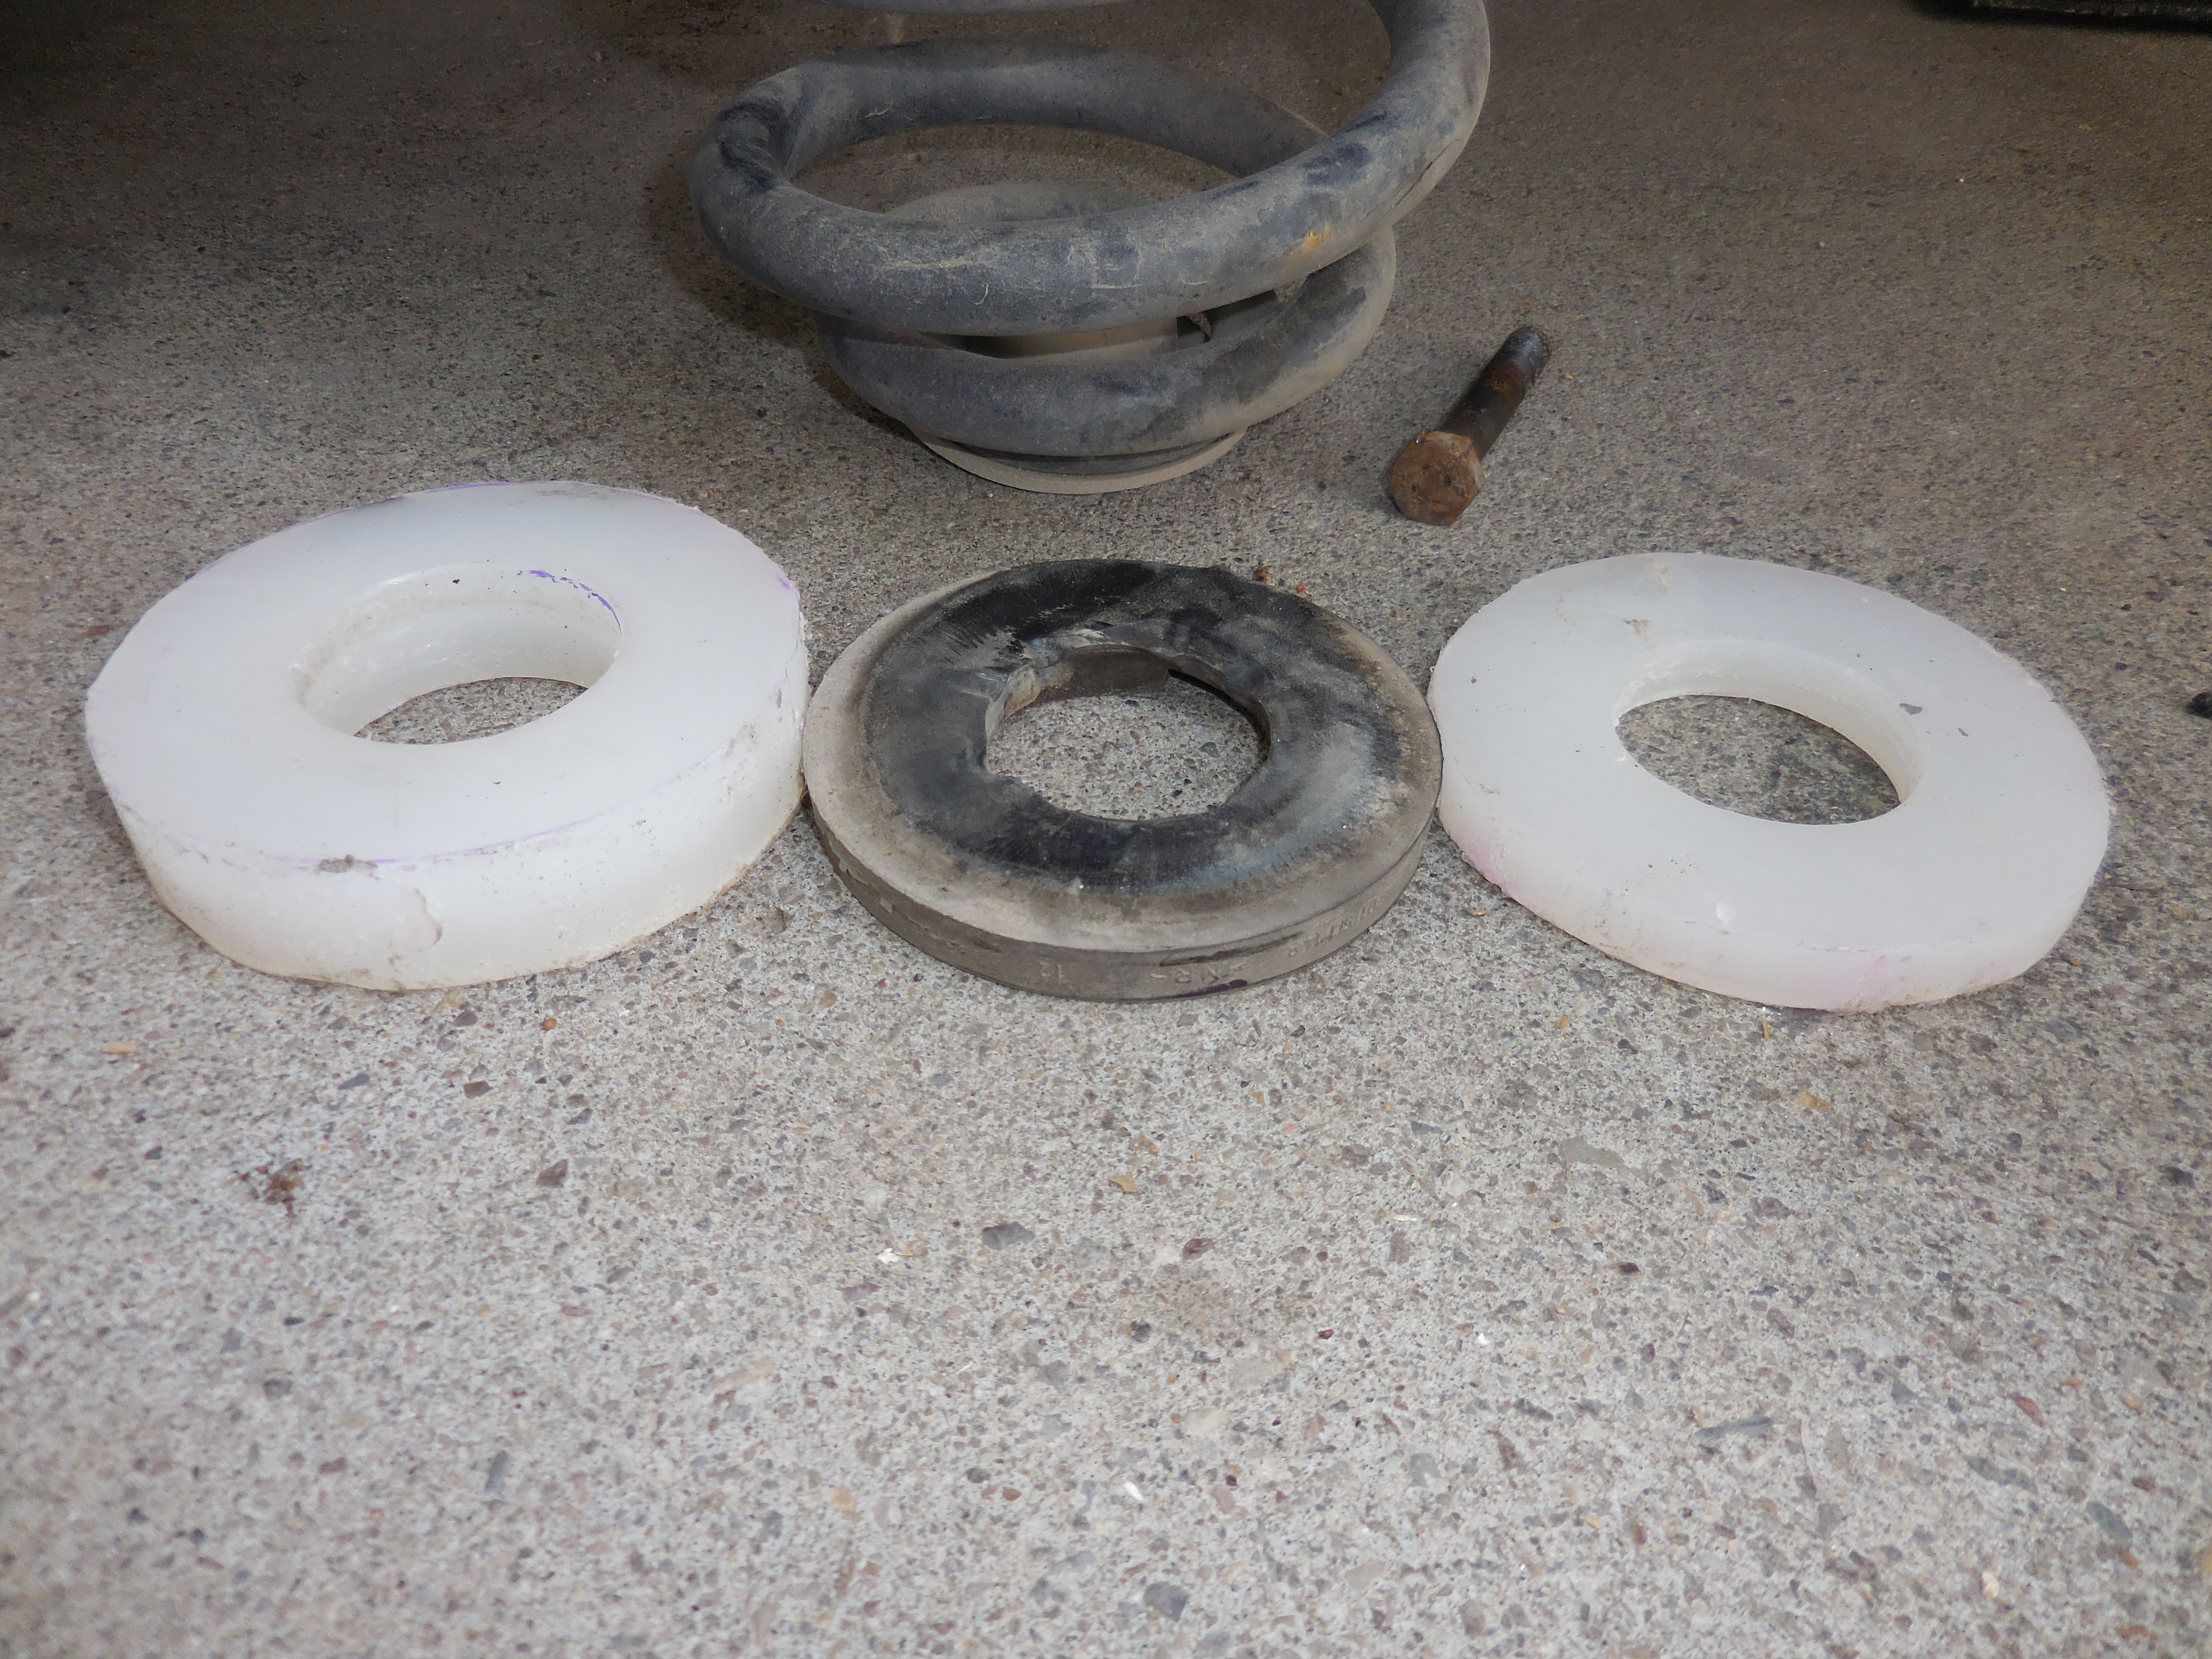
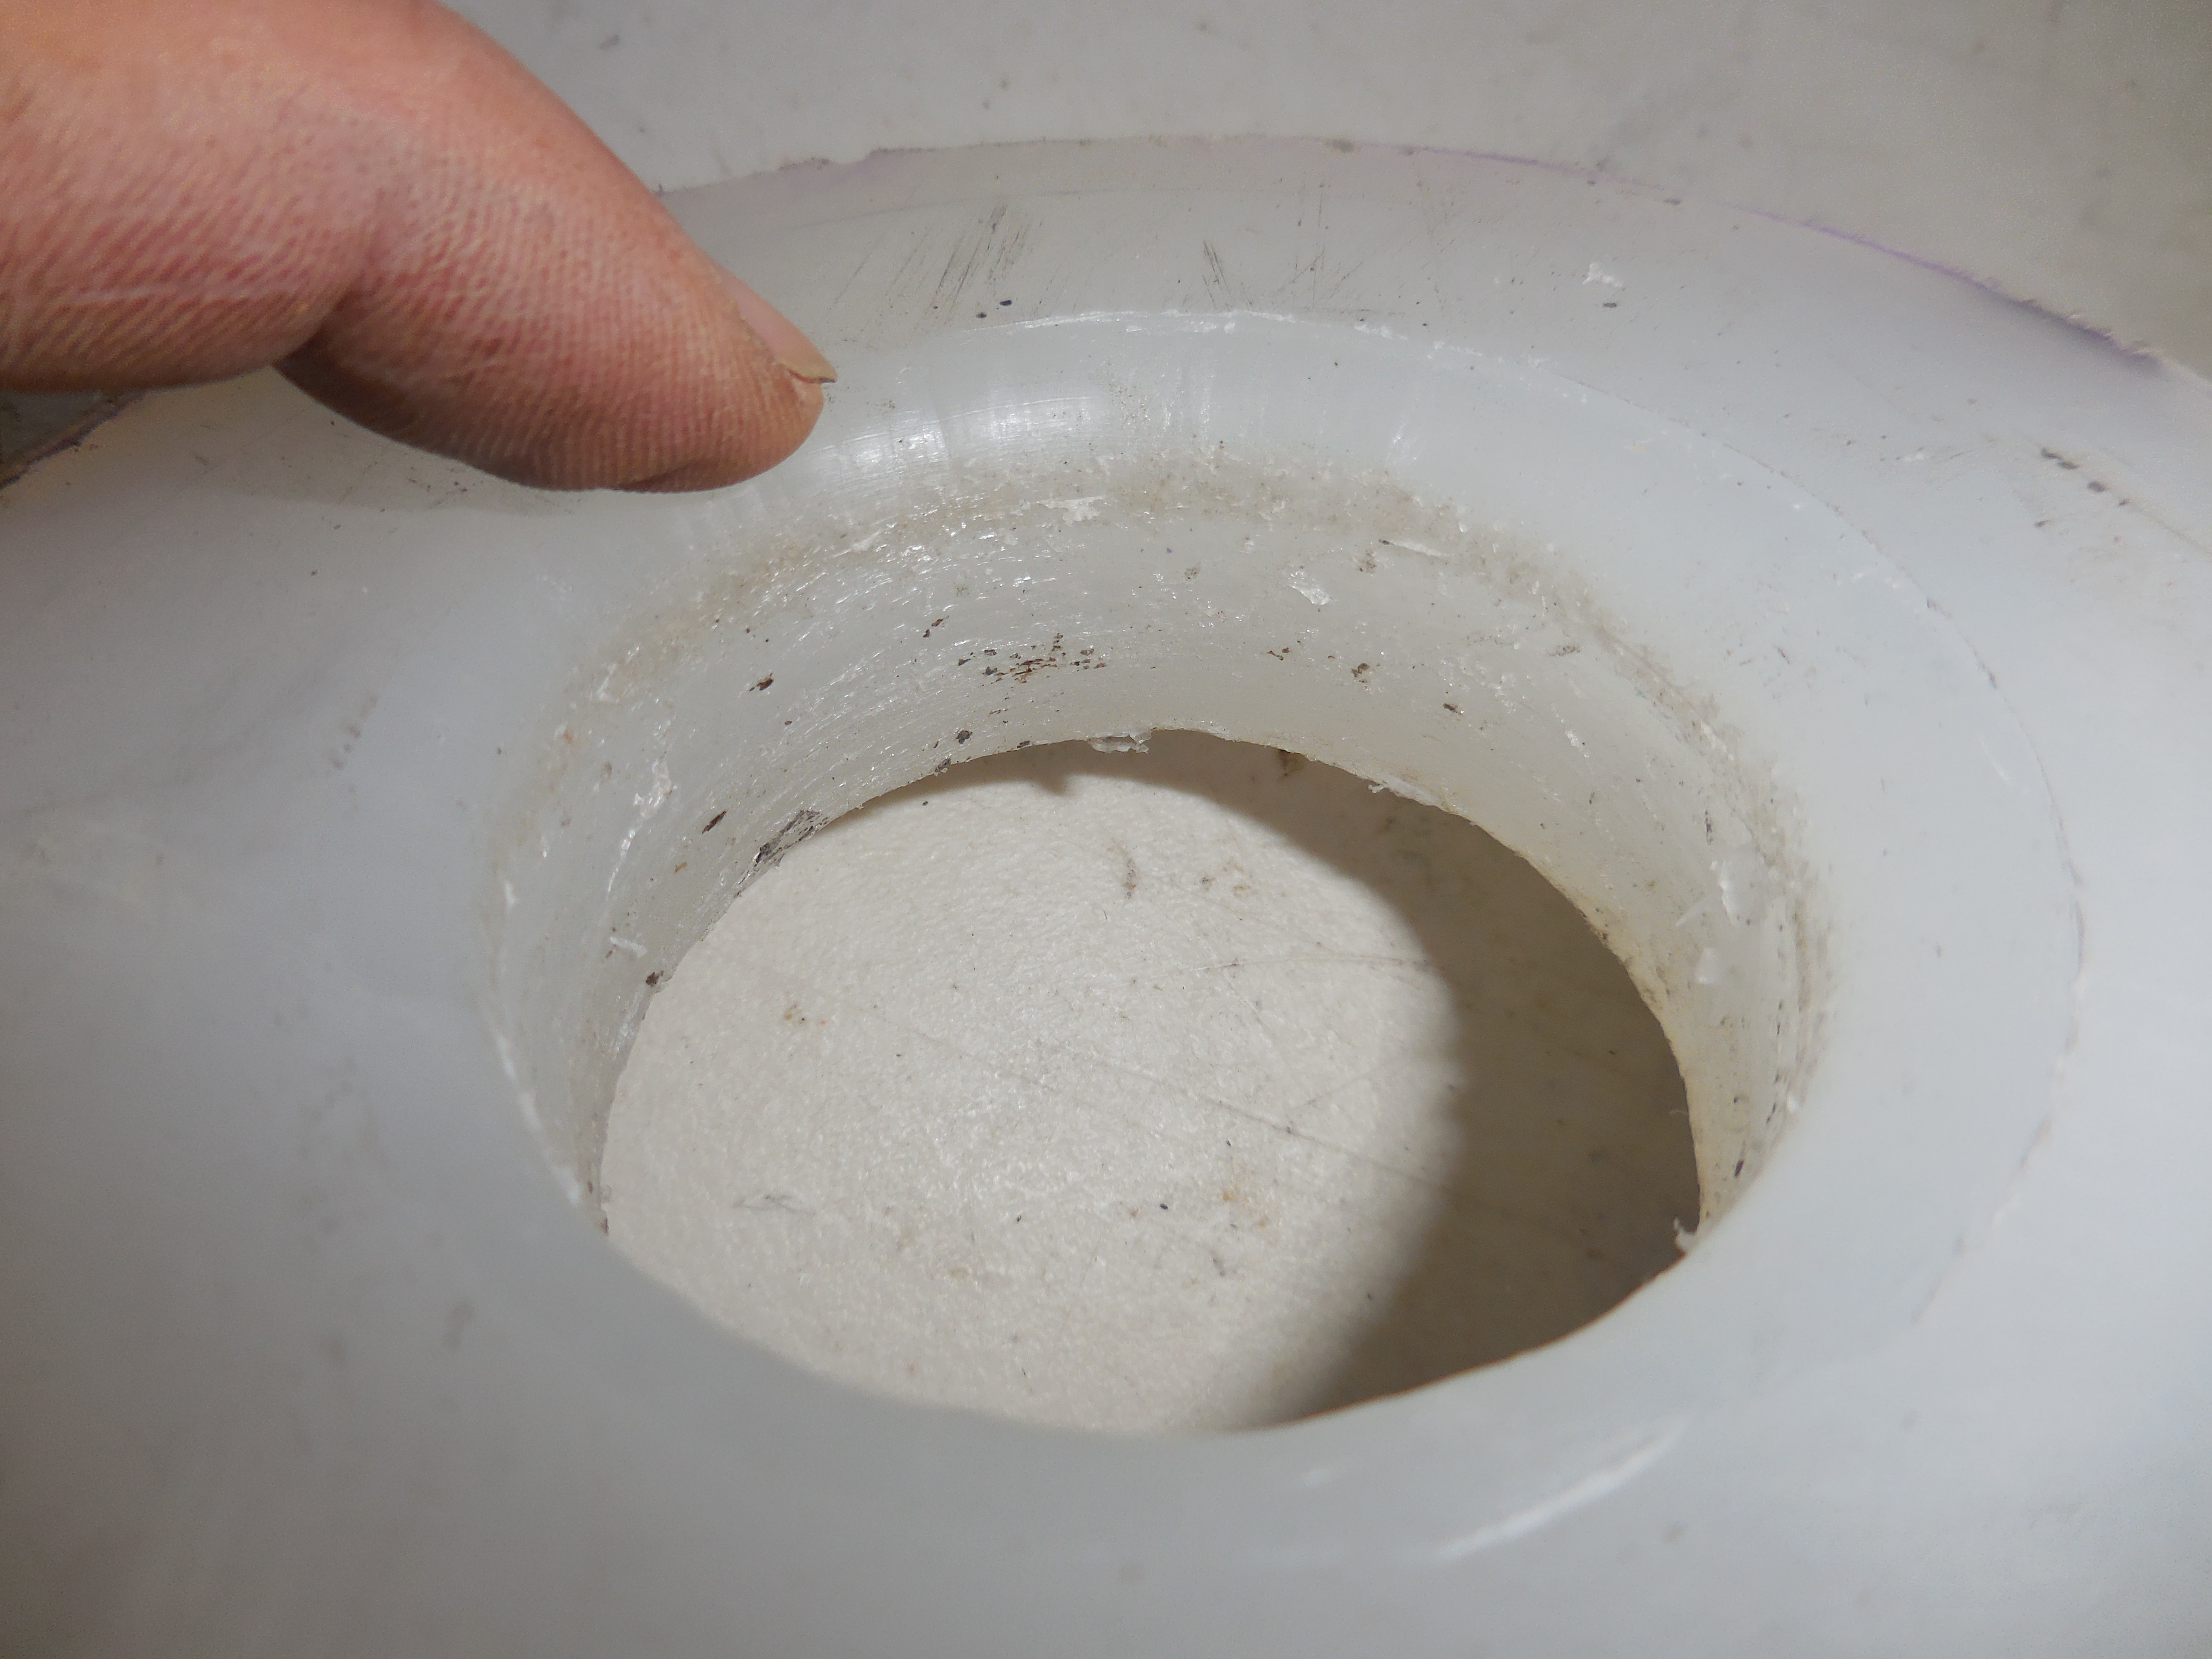
| My
homemade spacers on the left (1" for drivers side)
and right ( ½” for passenger side). The black
center piece is one of the original VW rubber pads (one
per side) which are left in place. |
 |
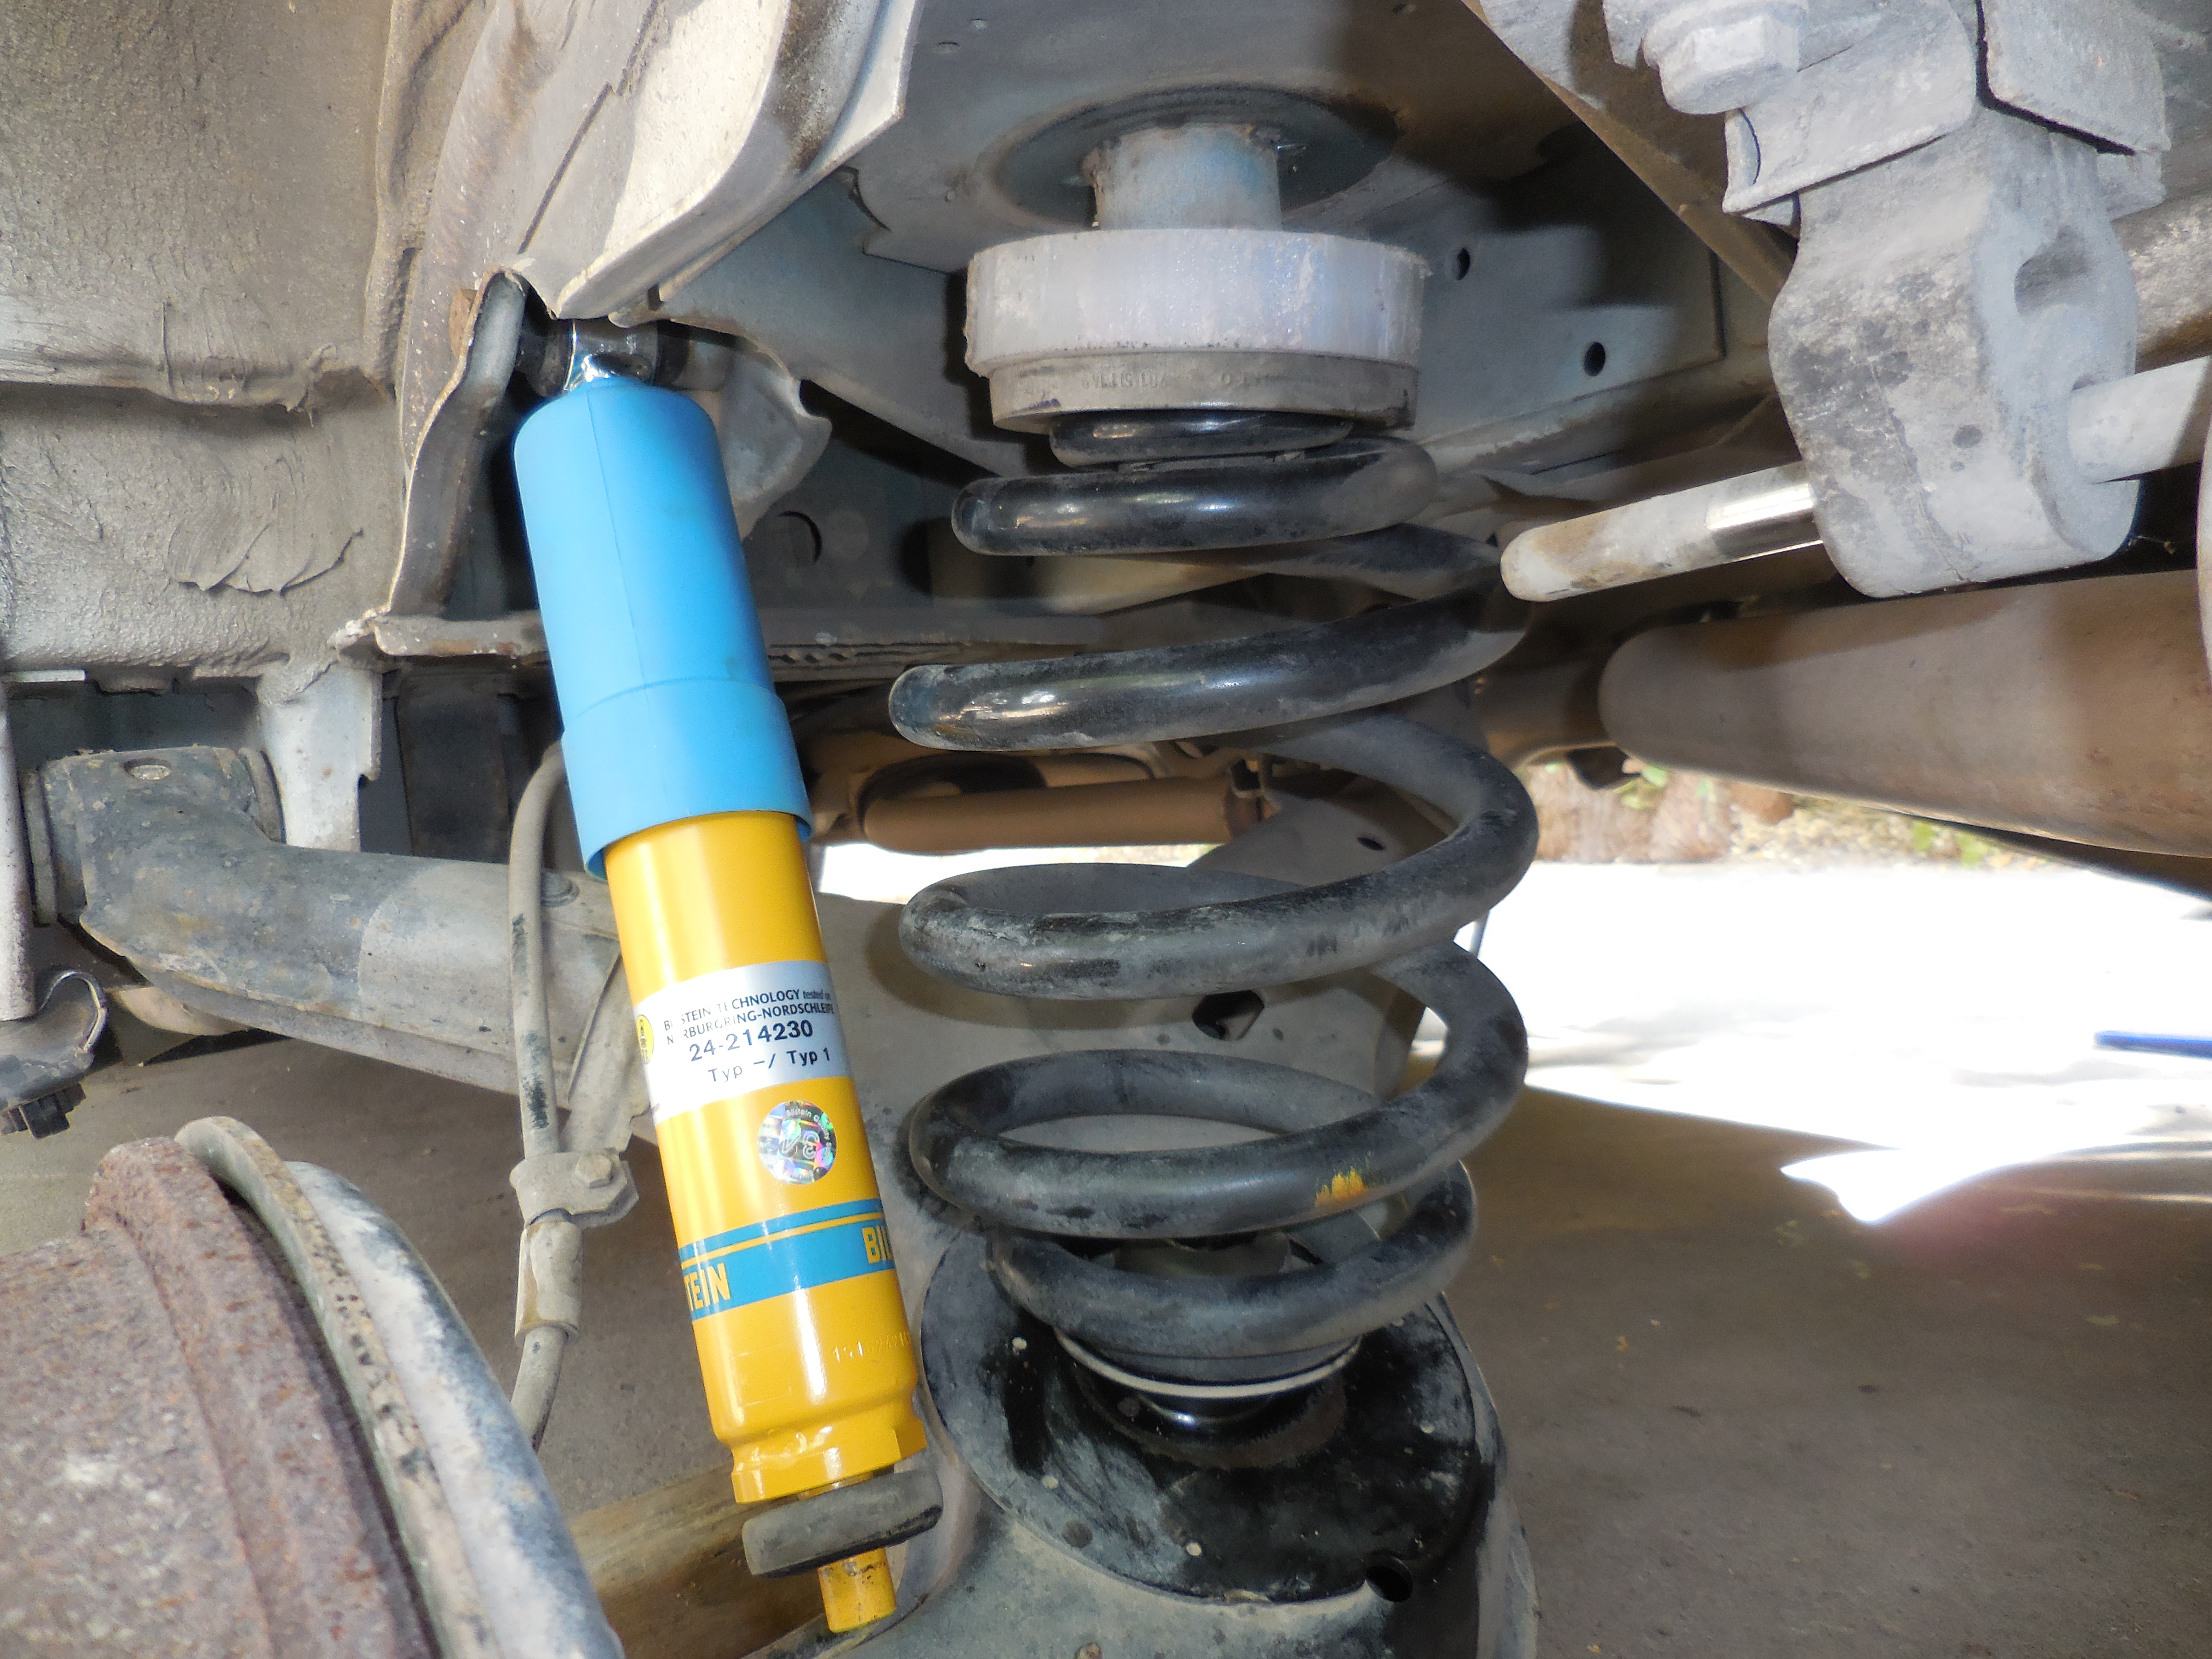 |
Here's
the 1" spacer installed on the drivers side, as well
as a new Bilstein HD shock. Note the original VW rubber
pad below the white spacer. |
| Due
to the spot welds which can be seen in the top right photo,
I routed the inside edge of each spacer (bottom photo)
so they would clear the welds and seat nicely against
the underside of the van. |
|
WARNING
I shall have no liability or responsibility to any person with respect
to personal harm or property damage caused indirectly or directly
by any material found on this web page. If you do any of these modifications,
do so at your own risk!
See
something on this page you'd like to have done to your van?
Contact
me and we'll discuss.
|